The Print dialog remains unchanged as the Mac OS drives it. From this menu, you can control most aspects of the printer.
The most important controls and features are accessed by clicking on the middle drop-down menu labeled "Layout.". In that menu you will find:
- Color Matching
- Paper Handling
- Cover Page
- Printer Settings
- Page Layout Settings
- Advanced Media Control
- Supply Levels
Don't see these options? Does your menu look like this?

If so you are looking at the AirPrint driver and not the Epson driver for your printer. In order to use color management and get the most from your printer, you will need to correct the error. Click here for help fixing the AirPrint Hijack.
Media Type

With each print, you must designate the type of inkjet paper (media) that you are using. You can think of media type as part color profile and part ink throttle. Different inkjet papers need different amounts of ink to perform properly, and this is where the media setting becomes important.

Even if you are using ICC color profiles, you need to choose the right the media type. The correct choice will be included with your profile's instructions. It is important to note that the drop-down menu at right is a fixed list and only contains Epson media names. When using non-Epson papers, you are going to choose the closest media type.
Quality Options

To get to this menu, go to the Output Resolution drop-down. Your options are:
- Standard - 1440dpi / High Speed /Finest Detail
- Quality - SuperFine 1440dpi / High Speed / Finest Detail / Black Enhance Overcoat
- High Quality - Photo 1440dpi / High Speed / Finest Detail / Black Enhance Overcoat
- Max Quality - SuperPhoto 5760dpi / High Speed / Finest Detail / Black Enhance Overcoat
- Max Quality (Carbon Black) - SuperPhoto 5760dpi / High Speed / Finest Detail / Black Enhance Overcoat
- Quality Options

With Quality Options selected, the quality slider bar becomes active. You can use it to move quickly between all five settings.
The checkbox options below the slider also become active when Quality Options are selected:
- Black Enhance Overcoat
- High Speed
- Finest Detail
Color

This drop-down controls printer color management. Provided your editing software is set to "Printer Manages Color," the Print Mode drop-down will display EPSON PrecisionDot and Advanced B&W Photo.
If this drop-down is grayed out (unavailable)
- Your printer software is managing color output or
- ColorSync is selected on the Color Matching tab (see below)
Color Mode

When the printer driver manages color, the Color Mode drop-down becomes active.
- Epson Standard (sRGB) - Increases the contrast in images. Note: This is the standard mode for most photos and documents when not using an ICC profile.
- Adobe RGB - Matches image colors to the Adobe RGB color standard. Use this setting if your source file was captured in Adobe RGB.
- Fix Photo - The printer manual only mentions PhotoEnhance so we will assume they are the same mode. From the Epson manual - Lets you choose from various Scene Correction settings to automatically analyze your photos. Note: PhotoEnhance uses a sophisticated face recognition technology to optimize photos that include faces. For this to work, both eyes and the nose must be visible in the subject's face. If your photo includes a face with an intentional color cast, such as a statue, you may want to turn off PhotoEnhance to retain the special color effects.
- Off (No Color Management) - Shuts down the printer's color management in favor of your image/editing software's color management system.
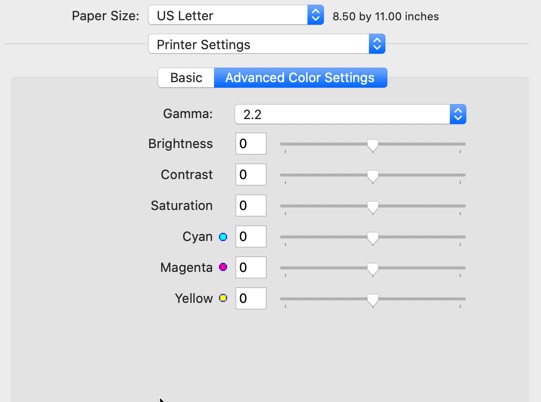
With Epson Standard or Adobe RGB chosen, the above controls are available via the Advanced Color Settings.

Fix Photo controls are available via Advanced Color Settings.
Color Matching

The Color Matching tab gives you access to the ColorSync controls. ColorSync is Apple's internal color management system. Though rarely used today, the system allows users of non-ICC aware applications like iPhoto to print using a printer color profile.
This menu should default to Epson Color Controls so that the Print Mode controls will be active. If you notice the Print Mode options are grayed out, and you did not set your editing software to manage colors, check the Color Matching tab. You may find that ColorSync is active. Clicking on Epson Color Controls will restore the Print Mode options.
Advanced Media Control

Color Density
The Color Density control acts as an ink throttle. If you encounter a paper that warps or buckles under heavy ink loads (this is usually image dependent), try setting Color Density to minus 10. It will typically help with the warping but will not degrade image quality.
Paper Sizes

Unlike the Windows printer driver, the Mac OS handles paper sizes. As a result, borderless printing is controlled from the paper size drop-down selection. See above.
There are two borderless modes -
- Borderless Auto Expand - The printer slightly increases the size of your image file to ensure ink prints over the edge. It can lead to a small loss of image detail around the edges. See below.
- Borderless Retain Size - The driver does not make any change to the size of your image file and EXPECTS that you have printed an image that is the same size as the paper. In some cases, you may see a small white margin on the edge of the sheet if the image is not large enough.
Borderless Printing Sizes - The P700 allows these pre-defined sizes to be printed without borders:
- 3.5 x 5
- 4 x 6
- 5 x 7
- 5 x 8
- 4 x 7.11
- 8 x 10
- 8.5 x 11
- 10 x 12
- 11 x 14
- 11 x 17
- 13 x 19 (Super B)
- A3
- A4

Auto Expand Details - When a borderless size with auto expand is chosen, the Expansion control on the Page Layout Settings tab becomes active. Here you can control the amount of expansion the driver applies to your image. We recommend the Max setting to be sure ink will print over the edge of your paper.
Manage Custom Sizes
Like other Epson printers, the P700 allows you to define custom paper sizes. According to the manual, the size limits are:
Paper Width: 3.5" - 13.00"
Paper Height: 5" - 708.66" (page length is limited by file size)

Access the Custom Paper Size menu from the Paper Size menu.

Scroll to the bottom of the paper size listing and choose Manage Custom Sizes.
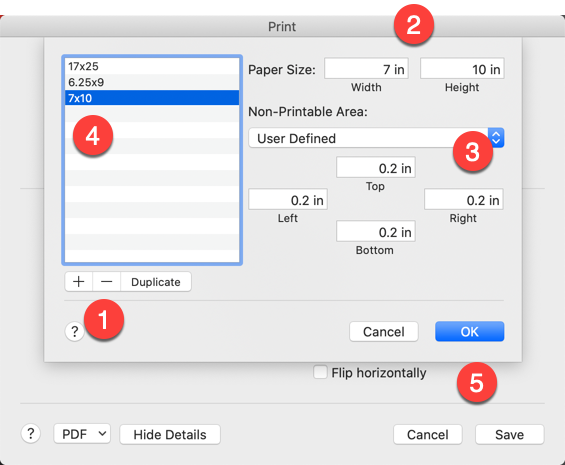
To create a custom size:
- Press the "+" button at the bottom left. A new size labeled "Untitled" will appear.
- Set the width and height of the paper. See below for IMPORTANT rules.
- Set the non-printable area. See below for IMPORTANT rules.
- Double-click the untitled size and rename it.
- Click OK. It will be available from now on in the paper size drop-down menu.
KEY CONCEPTS
Unless you are printing to a roll, do not set the margins smaller than 0.2". Making them smaller will likely cause a print error.
Width - Always the smaller dimension of your paper
Height - Always the larger dimension of your paper
Custom Borderless Sizes are an Option
Like the Epson P400 and P600, the P700 offers some custom borderless print capability. Borderless widths are fixed at the factory while you can define any borderless height/length.
Because OSX handles paper sizes, there are no obvious settings that alert you to this fact. Below we discuss the rules of custom borderless printing.

Create a new custom size using one of the WIDTHS listed below.
- Click the "+" button to start a new size
- Create a new custom size using one of the WIDTHS listed below. Width is always the smaller dimension of your paper!
- Set the non-printable area to 0 in all four boxes
- Double click on the new untitled size and rename it
- Click OK
The Non-Printable Area (margins) must be set to 0"
When you are ready to print, choose the new custom size from the Paper Size menu.
Custom Borderless Widths Available for the Epson P700
- 3.5
- 4.00
- 5.00
- 8.00
- 8.27
- 8.5
- 10.00
- 11.00
- 11.69
- 13.00

The Page Setup drop-down will become active, and you can choose to use the new borderless size in the rear sheet or front feed path. You can also select the roll option to print without borders on a number of roll widths.
This feature opens fun opportunities for printing borderless greeting cards as well as pano and landscape prints.
Borderless Greeting Cards
You can now print Red River Paper's 7x10, 8.5x5.5, and 8x9 Pano Cards without borders. Instructions for Setting Up these Custom Borderless Sizes.
Pano and Landscape Prints
You can now print stunning panos and landscape images on Red River Paper's 13" x 38" and 8.5" x 25" Flat Sheets.
Paper Handling

Use this tab to choose:
- Pages to print
- Page order
- Scaling images to fit a specific paper size
Printer Utilities

Printer utilities are accessed via Printers and Scanners. (Apple icon > System Utilities > Printers & Scanners)


Open the Status Monitor, begin a nozzle check, or print head cleaning from the printer utility.

The options menu contains many of the same controls you will find on the printer's touch screen panel.
Advanced Black & White

The Epson P700 has three black inks available for your printing needs. Using the Advanced Black & White (ABW) mode, the P700 blends these inks to create a neutral black & white image. The system can also create toned grayscale images from cool, to warm, to sepia.
To access ABW, go to the Printer Settings menu and select "Advanced B&W Photo" from the Print Mode drop-down.

When ABW is active, A "Color Toning" drop-down menu appears. This is the quick method of using ABW for basic neutral or toned images.
ABW - Advanced Settings
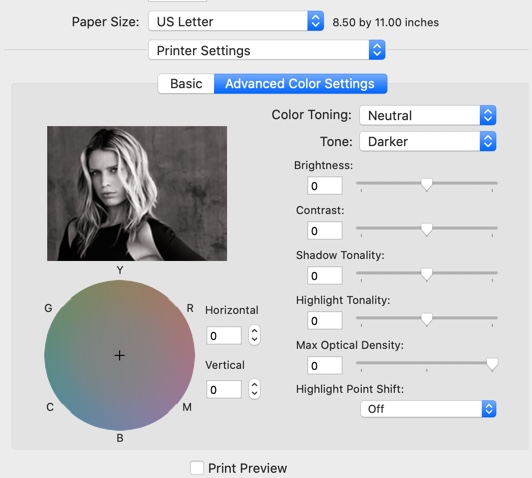
For more detailed adjustments, clicking the Advanced button above brings up the Color Controls menu for ABW.
A number of variables are available, including a color wheel for precise toning work.
However, any changes to these settings cannot be soft-proofed from when printing directly from Photoshop, Lightroom, and other similar programs. You can see an ABW soft-proof by printing from Epson Print Layout, a stand-alone image printing program.
Last updated: August 19, 2021


