There are a few inkjet printers that can print 7x10 without borders
Canon makes a small number of printers that can print Red River Paper 7x10 cards without borders. This is because they have added the 7x10 size to the driver and have allowed it to be a borderless size. Thank you Canon!
- Canon PRO-200
- Canon PRO-200S
- Canon PRO-300
- Canon PRO-310
- Canon TS9521C
- Canon TS9520
If you do not have one of these Canon printers, you may be able to get borderless results with some printer models.
NOTE: the Canon Pro-1000, Canon Pro-1100, Epson ET-8550, and Epson ET-8500 do not support borderless printing on 7x10.
Hack to make some printers to print 7x10 without borders
Beginning note: This process is requires more steps than printing cards with borders. You will run the paper through your printer twice for the outside of the card. It requires a 13" wide inkjet printer.
This process will not work with newer Canon printers like the PRO-1000, PRO-100, PRO-10, and PRO-1. This is because they feed paper from the center of the paper tray.
This tutorial covers printing the outside front of a 7" x 10" sheet so that the front is borderless. You should Review Our Other Tutorials for how to setup the back and inside for printing.

In Photoshop or other software, open your photo for the outside front of your card. It will need to be exactly 5" x 7".
The image above represents a 5" wide x 7" high photo that will go on a horizontal open card - one that opens like a book.
Note: To create a card that opens vertically, you will need a photo that is 5" high x 7" wide.
Printing
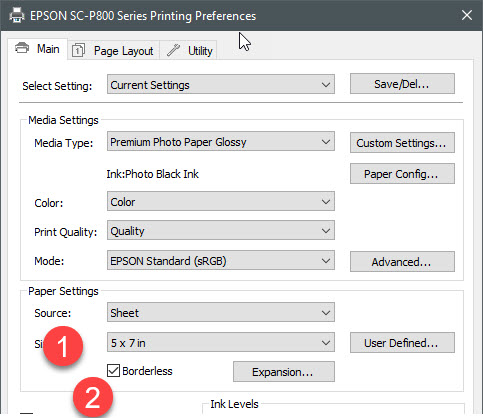
1 - In the printer properties, set paper size to 5x7.
2 - Choose the borderless printing option.
Orientation
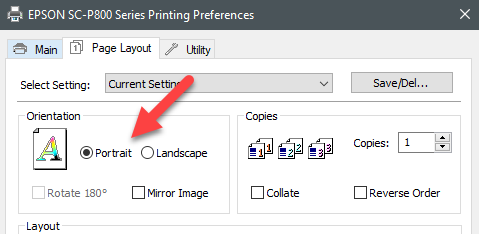
Landscape for a card that opens from bottom to top.
Portrait for a card that opens like a book.
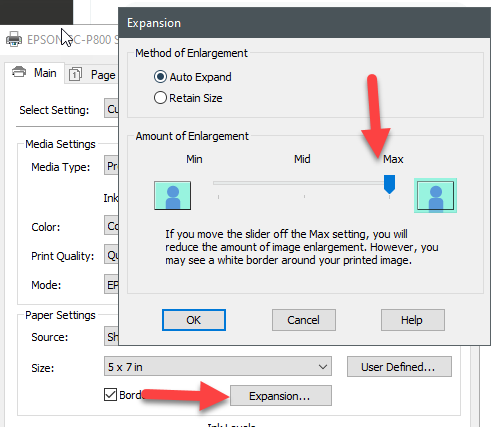
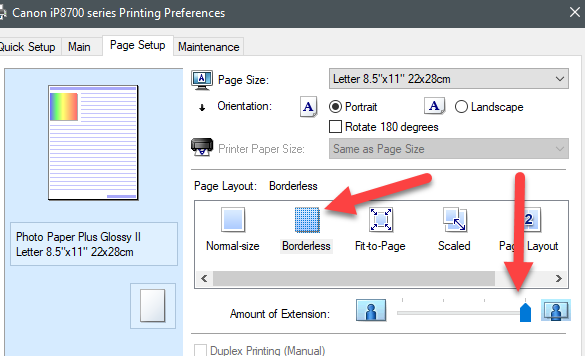
Set the borderless expansion to its minimal setting
This minimizes the chance ink will print over the fold line. Here are Epson and Canon screengrabs to help you find that setting.
Loading your paper

Put the paper in the printer long end down (opposite from how you would normally put paper in the feed tray).

When you print, the printer should bleed ink off the three exposed edges (top, right, and bottom) of the right hand side of the paper on the right hand side of the score.
Finished outside front of your card is now complete.
Go to Card Layout Instructions Home
Troubleshooting - If your image comes out so it is upside down when the card is folded, you will need to rotate the image 180 degrees. Consult your photo software for help with that process.
Related Posts and Information
Last updated: October 17, 2025


