Note that there will always be a small white border around on the outside edges of Red River Paper greeting cards .
Cardsmith by Ohanaware is an easy to use card setup program. You can make completely custom card layouts or use their templates. We encourage you to explore the software, click around, and learn as much as you can about it. Our tutorial will show you how to set up a basic card - photo on the front and text on the back. If you want more complexity, take time to learn the features of Cardsmith.
STEP 1 - Begin a Portrait Blank Card Project
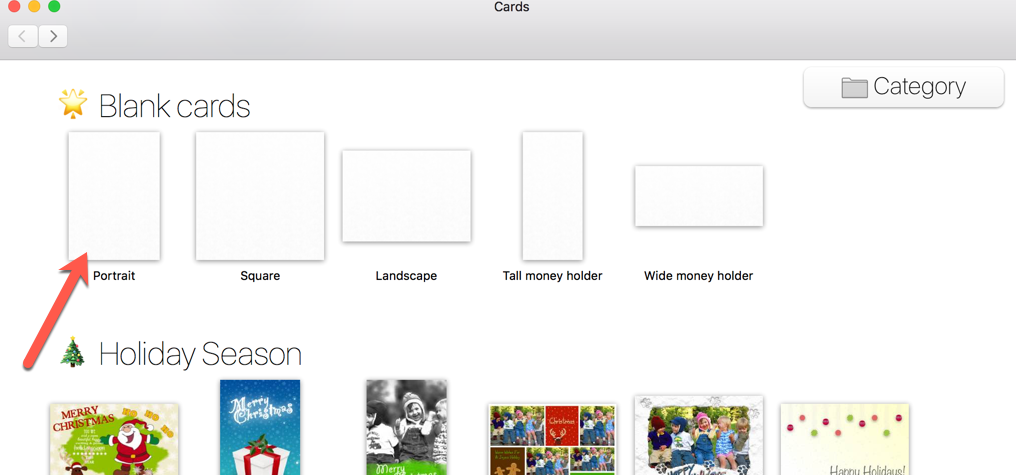
A new blank card layout will be started
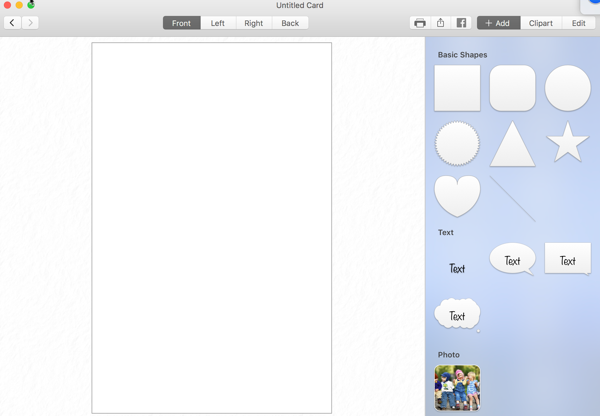
Cardsmith is set up so you work on one panel of the card at a time. For example, the outside front and the outside back. Switch between them by clicking on the buttons near the top of the screen:


Step 2 - Card Size Setup and Custom Paper Sizes
Cardsmith can create cards on any paper size. In order to use Red River Paper's line of cards, you will need to define a custom paper size using the steps below. Follow them carefully as this portion is critical to your printing success.
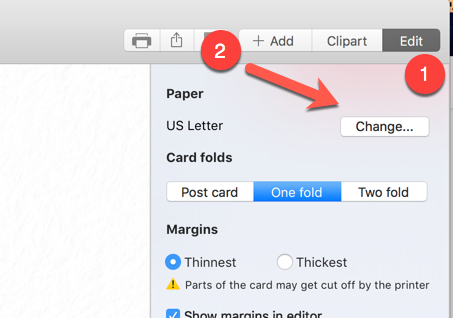
At the top right of your screen -
1 - Click EDIT
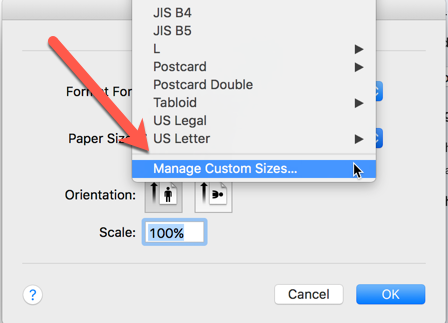
2 - Next to the Paper Size, click CHANGE
The Page Setup menu will appear.
1 - Choose your printer in the Format For drop down menu.
2 - Click on the Paper Size drop down menu.
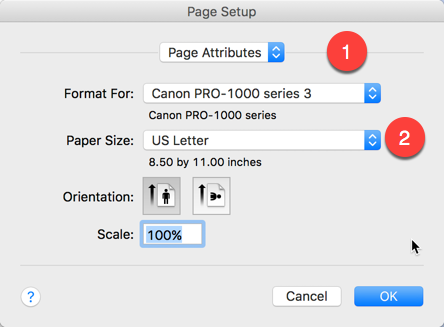
Scroll down in the paper size list and choose Manage Custom Sizes.
1 - Click the "+" button to create a new custom size.
2 - A new undefined size will appear in the listing. Click it once and name it something logical, like the paper size, or something you will remember.
3 - Define the new paper size using the PAPER SIZE SETUP GUIDE below. Follow it precisely.
4 - Set the Non-Printable Area to .2 inches as shown below.
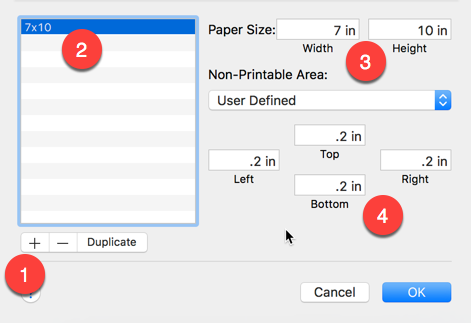
PAPER SIZE SETUP GUIDE
| Paper Size | Width | Height |
| 7 x 10 (A7) | 7" | 10" |
| 6.25 x 9 (A6) | 6.25" | 9" |
| 5.5 x 8.5 (A2) | 5.5" | 8.5" |
| 5.25 x 5.25 (Square) | 5.25" | 5.25" |
| 8 x 9 Pano | 9" | 8" |
Once defined, the custom size will always be available under the name you assigned in the paper size drop down menu.
When you are satisfied you have defined the new paper size properly, click OK.
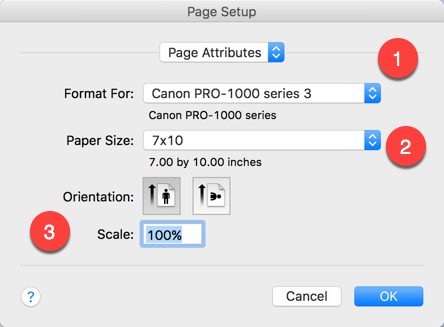
You are back at the Page Setup dialog.
1 - Verify your printer is still selected
2 - Verify your new custom paper size is selected
3 -
CLICK THE VERTICAL (PORTRAIT) ORIENTATION BUTTON. This is a critical step!
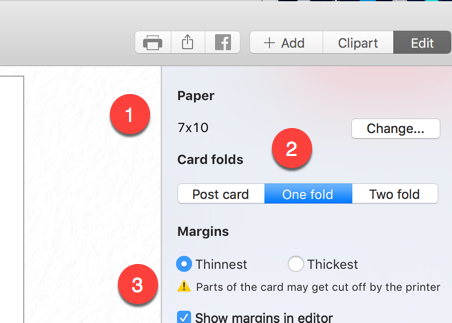
Once you have clicked OK above, you will be back in Cardsmith and can verify the following:
1 - The paper size is your new custom paper size
2 - You have selected the ONE FOLD
option
3 - Margins are set to Thinnest - NOTE! There will always be a margin when printing with a custom size. Borderless card printing is not
possible.
Step 3a - Creating Your Card Front
Let's start with the outside front of your card. Verify you have that panel active:
Click the + Add button

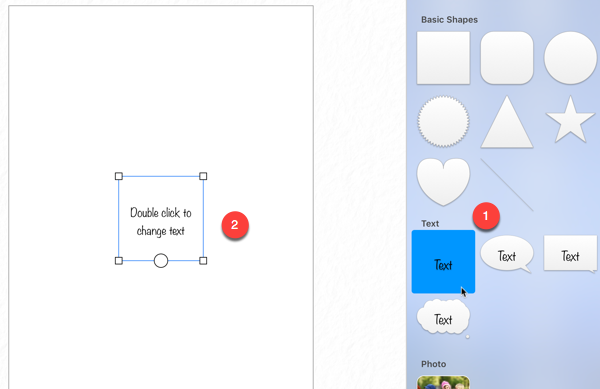
As you can see below, there are a number of options for card layout and design. To add an image to your layout, DOUBLE CLICK the Photo icon as shown below.

A dialog will appear so you can locate your image. Once you pick an image, highlight the file name and click Open.

This next part can be a bit challenging. The image will probably appear as a small version on your layout. You will need to change the image size to fit properly on the card. You can do that in two ways:
1 - Use the anchors to click and drag the image larger or smaller.
2 - Use the Size dialog to enter the width and height of your image. You will find a table below that shows the maximum size an image can be for each paper size.
Cardsmith has margins built in, so you will see where your image stops as you move it around.
Spend time learning this process and experiment. It is fairly intuitive
but you need to put some effort into seeing how it works.

This table shows your maximum printable area for our card sizes.
| Card Size | Max Image Width | Max Image Height |
| 7 x 10 (A7) | 4.75" | 6.75" |
| 6.25 x 9 (A6) | 4.25" | 6" |
| 5.5 x 8.5 (A2) | 4" | 5.25" |
| 5.25 x 5.25 (Square) | 5" | 5" |
| 8 x 9 Pano | 3.75" | 8.75" |
Step 3b - Creating Your Card Back
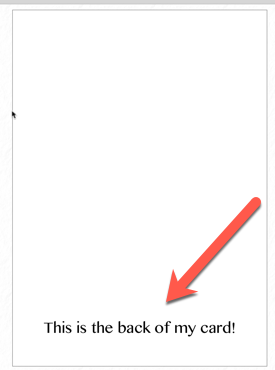
The outside back of your card can have anything on it you like. Images, graphics, logos, font are all available using Cardsmith. For the purpose of this lesson, we are going to put a simple line of text on the back of the card.
Switch to the outside back of your card layout.
Click the + Add button at top right.
You will see a number of text options.
1 - Select your text option.
2 - A text box appears on the layout. Double click it to change and format the text.
The font controls appear on the right. They include a number options. Spend time to experiment with fonts, sizes, colors, alignment, etc.
Clicking on text on the layout will select it for editing. You can also use your mouse to click and drag the text where you want it to appear on the card.
Here is a very basic example of text on the back of a card layout.
When you are satisfied with the back of your card, you can print.
Step 4 - Printing Your Card
Click the printer icon as shown below.

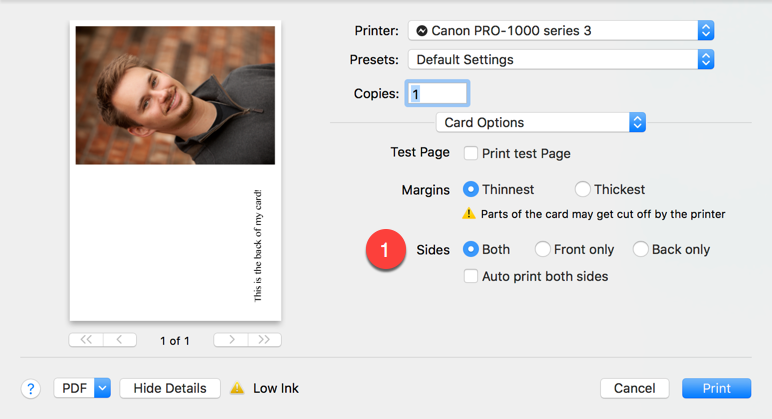
The print dialog appears and you will see a preview of your card. Provided you followed the steps above, the preview will look accurate.
If it does not look right, go back and verify the custom paper size definition and the orientation in Step 2.
1 - Select the Both option for Sides
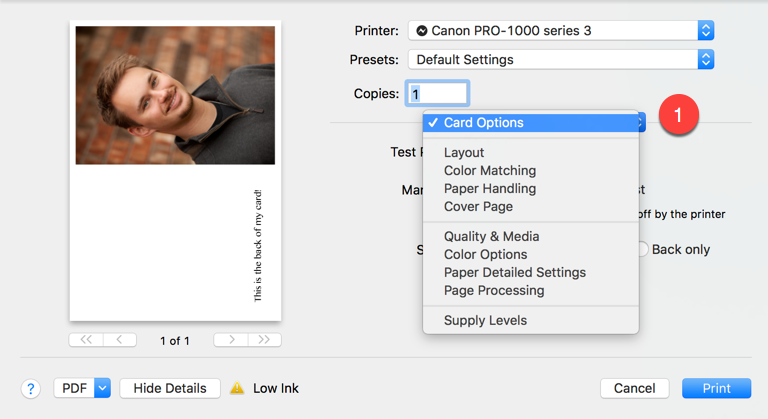
1 - All of your standard printer controls are available in this stop down menu.
Remember to set your media type and print quality before printing.
That's it! Load some card stock (or a practice sheet of plain paper cut to size) and click Print!
FAQ
My card preview looks wrong before printing.
Work through Step 2 again and be certain you have defined the paper size and set the paper orientation according to the instructions.
Can I print my cards without borders?
No. 99% of inkjet printers do not allow for borderless printing with a custom size.
Can I use color profiles with Cardsmith?
No and yes. The program is not "ICC aware", meaning that the developer did not put color management controls in the program. Most users will allow the printer to manage colors and get great results. If you are intent on using profiles, you will use Apple's ColorSync option under the Color Matching tab, seen in the screen shot above.
What if I want to print on the inside of my card?
Use the same steps and process above for the inside of your card.
Can I put more than one image on the outside of the card?
Yes, Cardsmith will allow you to put as many images as you wish. They can be sized and moved about on the page by clicking and dragging.
Related Posts and Information
Last updated: February 02, 2020


