How to Print Inkjet Note Cards and Greeting Cards with Aperture
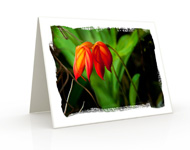
Setup for Horizontal Photo Cards This tutorial was built using Aperture 3. It is for inkjet note cards with horizontal format images. Your cards will look like the example at right. |
 |
You should already have some images in your Aperture library that are ready for card printing.
Start by selecting (highlighting) one or more images. When you select more than one, Aperture will create a project that will print cards with each image. This is a great way to quickly print collections.
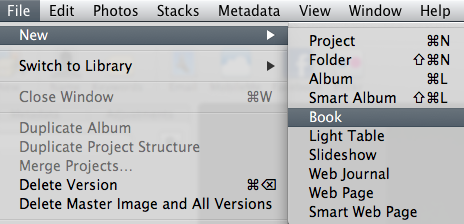
Start a New Book (Template) Go to the File menu and select New > Book |
 |
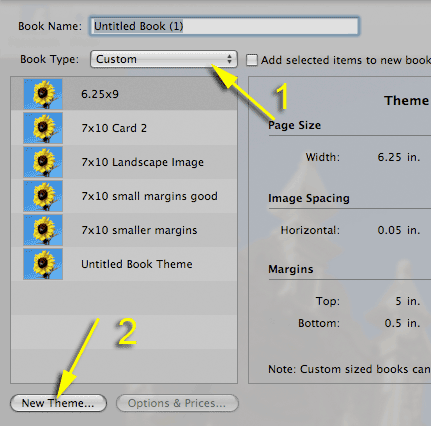
1. Click on the Book Type drop down and select Custom 2. Now click the New Theme button at the bottom left of this dialog. |
 |
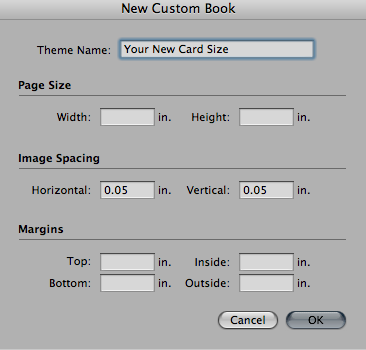
The New Custom Book dialog is shown at right. Start by naming the theme. We suggest using the size of the card, such as 7x10 for Red River's 7" x 10" scored size. Now enter the Page Size and Margins using the Guide to Card Theme Setup chart below. NOTE! We're setting margins so that they are 0.25" on all sides of the image. You may have to increase these numbers if your printer cuts off your image. The 0.25" setting is the smallest margin we recommend trying. Click OK when you have entered the page size and margins. |
 |
Guide to Card Theme Setup
All numbers are in inches
| Card Size | Width | Height | Margin Top | Margin Inside | Margin Outside | Margin Bottom |
| 7 x 10 | 7 | 10 | 5.25 | 0.25 | 0.25 | 0.25 |
| 6.25 x 9 | 6.25 | 9 | 4.75 | 0.25 | 0.25 | 0.25 |
| 5.5 x 8.5 | 5.5 | 8.5 | 4.5 | 0.25 | 0.25 | 0.25 |
The image(s) you selected at the beginning will now be added to this new project. The page will change to the layout tool configuration.
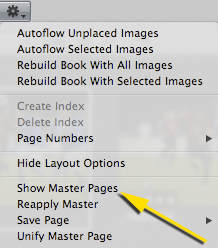
Go to the Gear Icon (about the middle of your screen and to the left a bit) and choose "Show Master Pages" The display will change and you'll have a section called Master Pages now available above the Pages section. |
 |
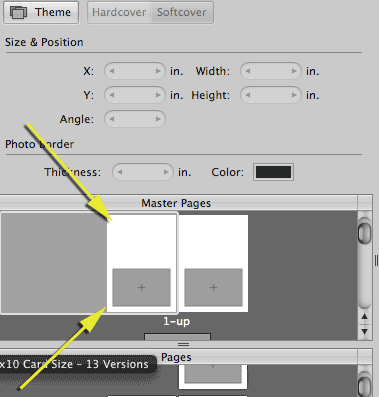
Now click on the "1-up" Master Page template. It will be the second template you see in the display. |
 |
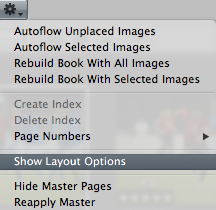
Go back to the gear menu and click on Show Layout Options. The dialog below will appear over the Master Pages display.  |
 |
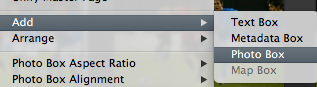
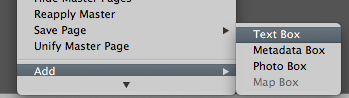
Now go back to the gear menu and choose Add > Photo Box. |
 |
You will see a placeholder for the photo appear on the main layout at right. See screengrab below.
Click on the photo box to select it.
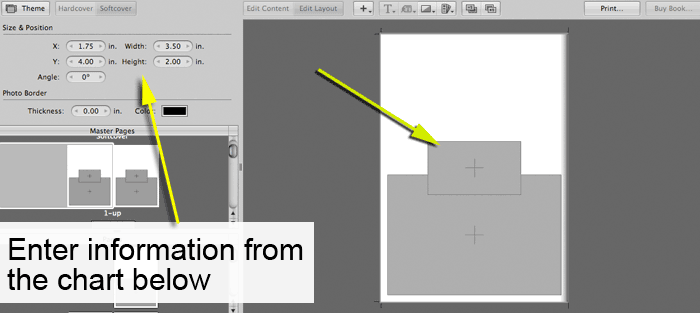
Enter the numbers from the table below into the Size & Position X, Y, Width, and Height boxes.
This step defines the size of the photo (width and height).
The X and Y are distances from the left side and bottom of the layout.
You can adjust these to fit your needs. The numbers below set the MAXIMUM photo size and center the photo on the layout.
Size & Position
| Card Size | Width | Height | X | Y |
| 7 x 10 | 6.5 | 4.5 | 0.25 | 0.25 |
| 6.25 x 9 | 5.75 | 4 | 0.25 | 0.25 |
| 5.5 x 8.5 | 5 | 3.75 | 0.25 | 0.25 |
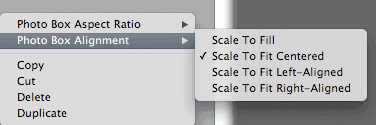
Right click (CTRL+Click) on the resized photo box and choose Scale to Fit Centered. The card setup is now complete as far as photo and layout are concerned. |
 |
Text Create a Text Box You can place text on your card layout. Go to the gear menu and choose Add > Text Box. A text box will appear and you can then type your message. |
 |
A text box will appear and you can then type your message. |
 |
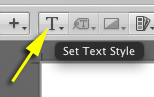
Once the message is typed, you can click the "T" button above the layout box to format your text. You can also move and resize the text box. Click on the box, then use the corner to click and drag. |
 |
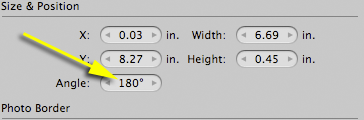
Rotate the Text 180 Degrees For this type of card layout, text on the back of your card must be rotated so it is upside down on your screen. Click on the text box. On the upper middle of the screen the Size & Position box appears. Set the angle to 180 degrees and the text will rotate to be upside down. |
 |
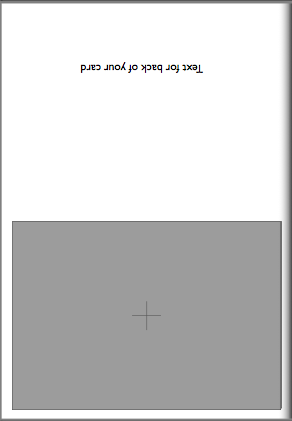
At right you can see the Master Layout with the photo box and the text box which has been rotated. |
 |
Placing Photo on the Layout
Locate the Pages box which is below the Master Pages dialog. Click on the 1-Up thumbnail.
Now, drag a photo from your filmstrip to the photo box on the main layout window (the big section on the right side of the screen).
Don't release your mouse until the cursor is on the photo box. When you release the mouse, the photo will appear properly resized in the photo section of your layout.

| To insure all of your sizes and settings are applied to the 1-Up layout, go to the gear icon and click on Reapply Master. | 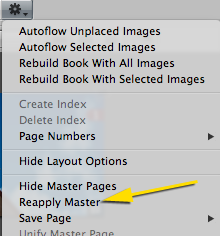 |
Printing
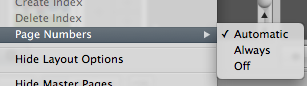
Turn off Page Numbers First, turn off the page numbers. To to the Gear menu. Now choose Page numbers > Off. |
 |
Now to to File > Print Book.
|
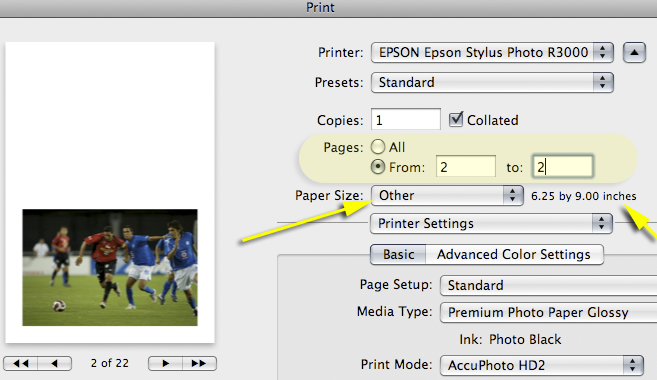
The print dialog will appear. Make CERTAIN that you:
This will insure you only print the card layout, and not the result of the templates in the book theme. Next, notice the Paper Size. Quite amazingly, Aperture senses the size of your layout and automatically sets the right paper size! This is a nice treat that will save you time. Below that you will see the typical printer setting controls. Set those according to your color management needs and paper type being used. |
 |
| Epson Printer Note: Check and verify your Page Setup drop down is set to Standard or Sheet. In some cases this will default to roll and you will get a print error. | 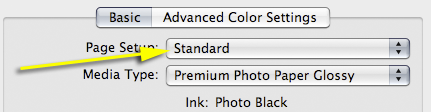 |
Once you make a test print and are satisfied you can save the print settings as a Preset.
Go back to the print dialog, make sure all the settings are correct.
Now go to the Presets drop down and choose Save As. You can now name the preset something like RR Card 7x10 or something similar depending on the size.
If you have questions, contact us through the support center
Related Posts and Information
Last updated: December 02, 2022


