A beginning note: This tutorial uses lots of screenshots
to help you understand the process better. If you have a dialup connection,
each page may take up to a minute to load fully.
READ THIS BEFORE
STARTING! -
This is a "general guide" for using PictureIt to set up and print custom
greeting cards on Red River paper. Microsoft
seems to release a new version of this program yearly. It recently was
converted
to Microsoft
Photo
Pro. There will probably be differences between the screenshots we use
and your version. It should be general enough for you to understand the
basics.
Step 1 - Make a custom Blank Picture.
Go to the File menu and select a New Blank Picture.
A blank page will appear in the work area and a menu
like the one at right will be available. Here, you set page size
to whatever paper size you are going to use.
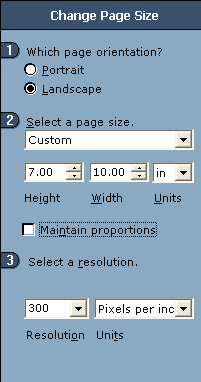
1) Page Orientation - Choose landscape if your card opens like
a book
2) Set Page Size to Custom in the drop down menu (see right)
3) Height and Width - turn Maintain Proportions OFF
Paper Size
Height
Width
7x10
7"
10"
6.25x9
6.25"
9"
5.5x8.5
5.5"
8.5"
Resoultion is ideally set to 300 pixels per inch
Click Done at the bottom of the dialog box
Step 2 - Adding pictures and text to the new
blank picture
Your newly created picture
will be blank and look like this. At this point, you can add photos,
text, graphics, or other artwork.
Using the Add Something feature,
choose pictures, text, or other effects to put on your card.
When you choose a photo to use, it will be dropped on the blank
layout. You can move, rotate, and resize the photo to fit on the
card properly.
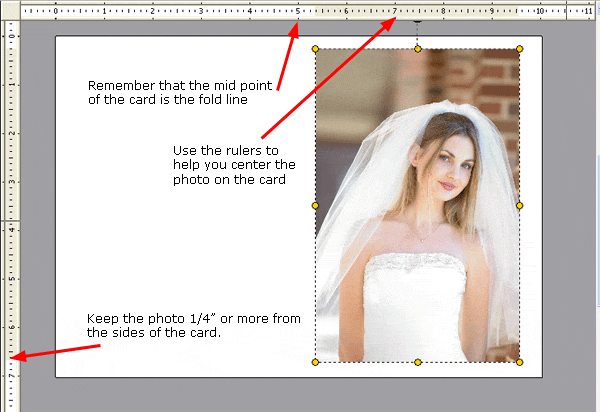
REMEMBER! You have to think of the blank page as your piece of
paper. The right hand half of the page is the outside front of the
card, where your image goes.
The mid-point of the card width is the fold line of the card.
You probably do not want your photo to cross that point.
Some tips for proper photo placement.
The 1/4" rule is important to remember
To keep the printer from cropping your photo, make sure you have
at least 1/4" space between the photo and the edges of your card
layout.
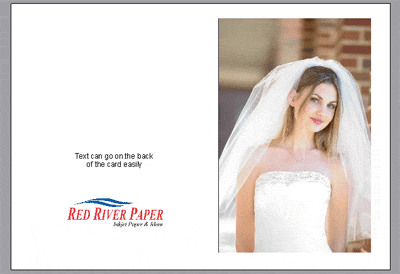
Here is an example of a
completed card with a photo, text and a logo on the back of the
card. These were all added easily
using the "Add Something" feature.
Papers with the Archival designtation can take many forms. They can be glossy, matte, canvas, or an artistic product. These papers are acid free, lignin free and can be made of virgin tree fiber (alpha cellulose) or 25-100% cotton rag. They are likely to have optical or fluorescent brightening agents (OBAs) - chemicals that make the paper appear brighter white. Presence of OBAs does not indicate your image will fade faster. It does predict a slow change in the white point of your paper, especially if it is displayed without UV filter glass or acrylic.
Archival Grade Summary
Numerous papers - made from tree or cotton content
Acid and lignin free base stock
Inkjet coating layer acid free
Can have OBAs in the base or the coating
Museum Grade Paper
Papers with the museum designation make curators happy. They are made from 100% cotton rag content and have no optical brightener content. (OBA) The base stock is acid and lignin free. The coating is acid free. This type of offers the most archival option in terms of media stability over time.
Museum Grade Summary
100% cotton rag content
Acid and lignin free base stock
Inkjet coating layer acid free
No OBA content
Photographic Grade Paper
Photo Grade products are designed to look and feel like modern photo lab paper. Most photo grade media are resin coated, which means they have a paper core covered by a thin layer of polyethelene (plastic) . Plastic gives the paper its photo feel, stability (flatness), water resistance, handling resistance, and excellent feed consistency.
Prints on photo grade media are stable over long periods. With pigment inks in a protected environment, you can see up to 80 years on-display life. All RC papers are Photo Grade for two reasons. Plastic content is not technically archival by museum standards. Also, the inkjet coating of all RC papers is slightly acidic. It facilitates instant drying and does not actually change the stability of your inks over time. Virtually all RC papers have optical brightening agents (OBAs).