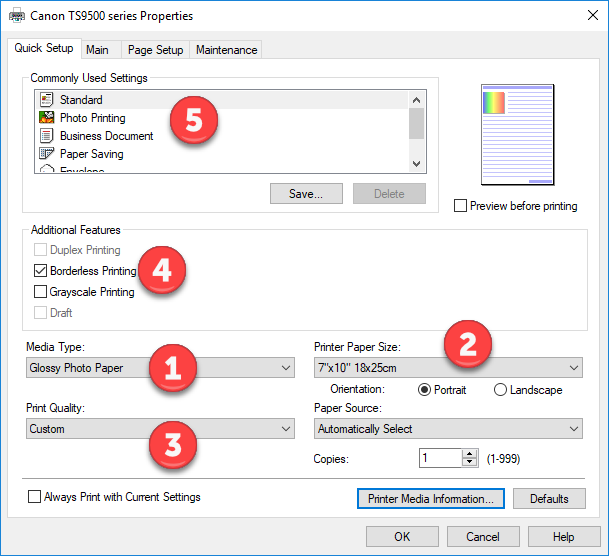
Quick Setup Tab
The Canon TS9521C printer drivers are basically unchanged from previous printer models. We're starting on the Quick Setup tab, which contains most of the controls you'll need for printing.
1 - Media (paper) type tells the printer the class of paper you are using
2 - Paper size and layout orientation
3 - Print quality can be set from draft to highest, depending on the media type
4 - Additional Features controls important options like borderless printing
5 - Commonly Used Settings are typically not used for our purposes. However, you can click the Save button and create a preset that remembers all of the settings below, which can be quite helpful and save time.
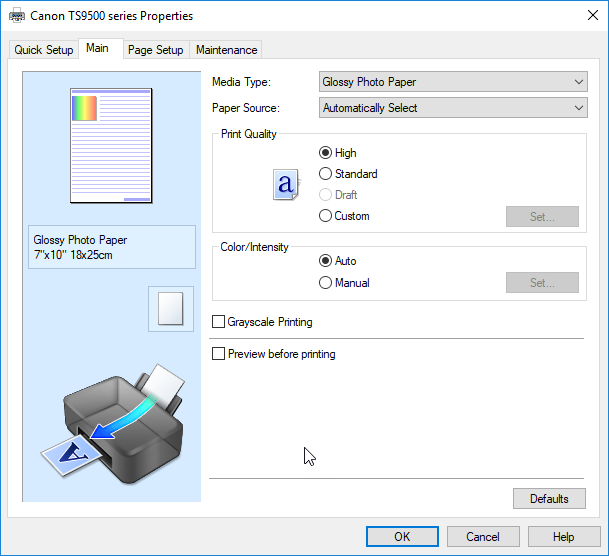
Main Tab
We recommend using this screen as much as possible. The options are much the same as the quick tab except here you have ready access to custom print quality and manual color controls for paper profile use.
You should typically avoid the "Preview before printing" as it can cause problems with paper profile usage. Most applications like Photoshop, Lightroom, and others will show you a preview before print.
Grayscale Printing is a basic feature that prints your images in black & white. The TS9521C is not designed for true grayscale, so getting a neutral tone black & white print is difficult. If you are into black & white in a serious way, there are a number of other printers to consider.
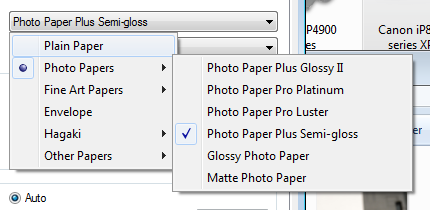 Media Type Media Type
When setting up a print job, you must tell the printer the type of inkjet paper (media) that you are using. Think of the media type as part color profile and part ink throttle. Different inkjet papers need different amounts of ink to perform properly - and this is where the media setting becomes important. If you are using paper profiles, the media type is critical. You have to set the media according to your profile's instructions in order to get the best results. Note! You will not see alternative paper brands, such as Red River Paper, in this listing. Only manufacturer inkjet media are in this drop down. |
|
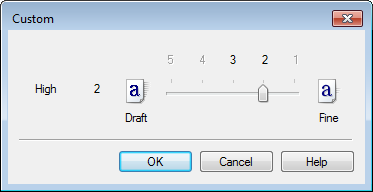
Quality Options Print quality can be controlled from the Quick Setup and Main tabs. Quality Choices On either the Quick Setup or Main tab, quality settings of Standard and High are available when using photo quality media. To access the custom quality menu, go to the Main tab, click on the Custom radio button, and then click Set. A slider controls the print quality setting. Level 2 corresponds to High and Level 3 to Standard quality. You will also find a third quality choice, the Level 1 setting. Canon has not given this setting a named label. We will call it "Highest" for the purposes of this review. Only glossy, semigloss, and luster media settings have Highest quality as an option. Lower quality settings such as Fast (Level 4) are available when plain paper or envelope media are selected. You would choose this setting for text and light graphic printing. |
 |
Color / Intensity The TS9521C driver color controls have an Auto and Manual mode. In Auto mode, the printer is completely in control of color management. You'll choose this setting if you are not using a printer color profile, and if you have found the printer's default setting to offer adequate output quality. For finer control, or to use printer color profiles, click the Manual radio button then click Set... |
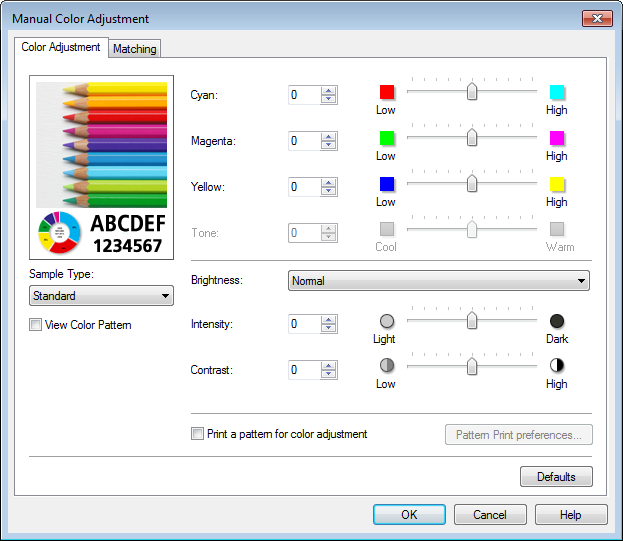
On the Color Adjustment tab you'll find a number of sliders. These are "rough" controls for color saturation, brightness, intensity, and contrast. We say rough because there is no color managed preview of your image with the changes. The workflow pattern would normally be print, adjust, print, and adjust until you got the desired results.
One answer to the problem is to use a printer color profile (click for this printer's profile library) for theTS9521C and your paper. Profiles take the guesswork out of correction and faithfully reproduce your file to the best of your paper's ability.
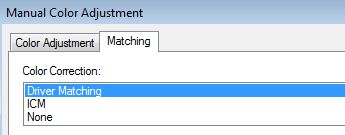
Driver Matching - this is the default setting when the printer driver manages color. None - this setting turns off the printer driver's color controls. Use this setting when you have a printer color profile and are using it to print via Photoshop, Photoshop Elements, Lightroom, Qimage, and the like. |
 |
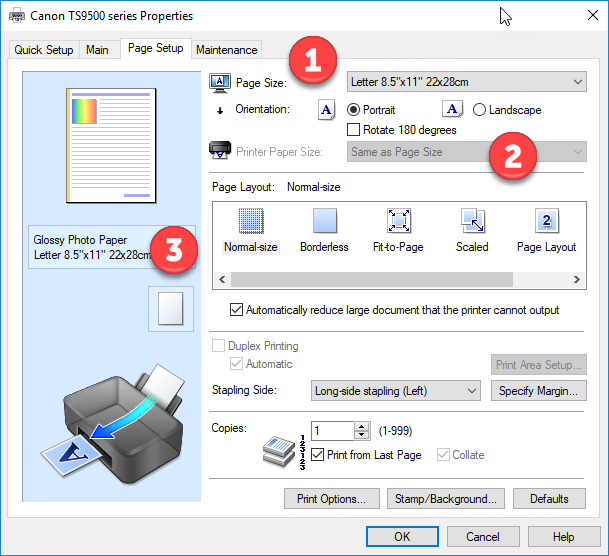
Page Setup
You should visit this tab each time you make a print so you can verify:
- Paper size
- Print orientation
- Layout options
Many options in the Page Layout section and below relate to document printing, setup, and finishing.
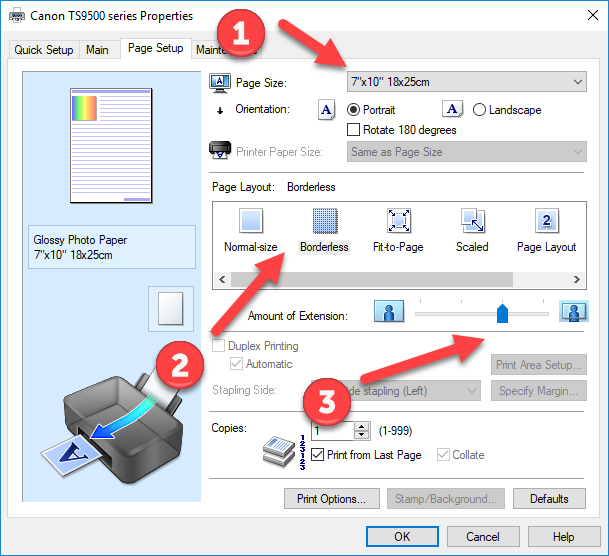
Borderless Options
Borderless print controls are of particular interest. When Borderless is selected, you will notice the Amount of Extension slider appear. When printing without borders, theTS9521C will automatically stretch out the edges of a file to ensure ink covers the edges of the paper. You can increase or decrease this function. Move the slider to the left for more extension. If you have a photo with important details at the edges reduce the amount of extension to avoid those areas being cut off.
To see all of your borderless options, come to the Page Layout tab and click the Borderless option first. Now, click on the Page Size drop down and it will only show paper sizes that can be printed without borders.
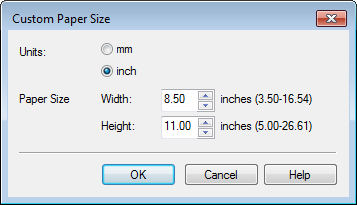
Custom Paper Sizes Like other Canon printers, the iP8720 allows you to define custom paper sizes. The limits: Paper Width: 12.95" - After some experimentation, we found that a custom size set to 13" causes a print error. Using 12.95" fixed that issue. You will notice 16.54 on the width scale. This seems to be a software coding error. Paper Height: 26.61" - We found the effective maximum print height is 26". |
 |
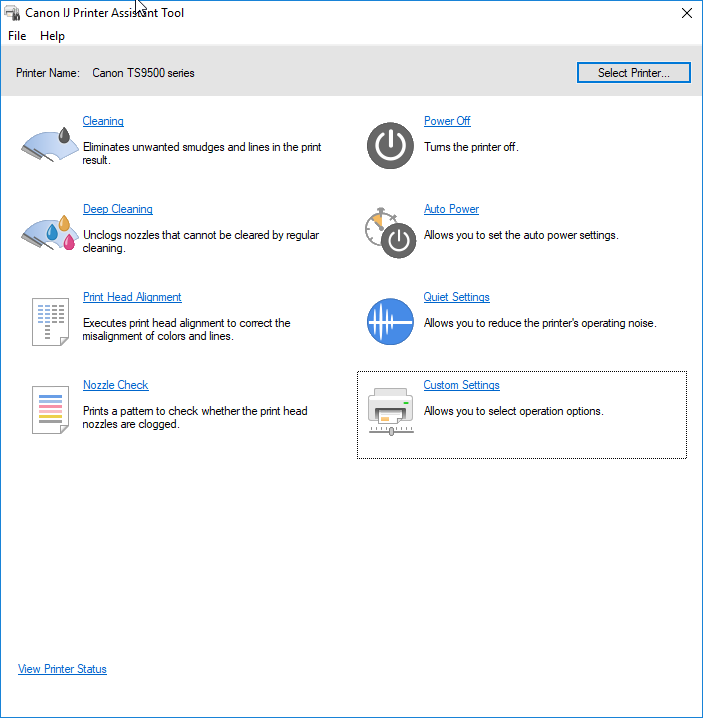
Maintenance Tab
Accessible from the Maintenance Tab is the Canon IJ Printer Assistant Tool. It includes both important and obscure options that you need to understand.
The key features are the Nozzle Check, Head Cleaning, and Print Head Alignment. If you experience a sudden change in print quality, this is the first place you should go. Start with a nozzle check. If that looks incorrect, run a head cleaning. If you see jagged lines or white gaps in your print, try the print head alignment.
You can call up your printer status dialog from this screen which will show you the printer's status and ink levels.
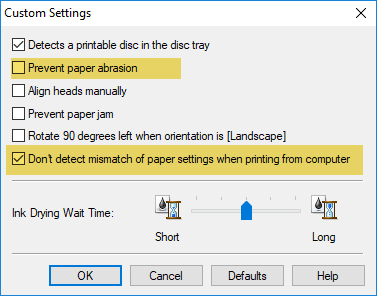
Custom Settings You will find a very important control in the custom settings menu, Prevent Paper Abrasion. Always turn it on when you use heavy or specialty media. We recommend using the feature with papers over 12mil thickness. A top tip is to check the "Don't detect mismatch..." option as soon as you set up the printer. It will prevent a driver error relating to paper size and setting compatibility conflicts that can arise with the printer's on-board control panel. |
 |
Related Posts and Information
Last updated: May 09, 2024


