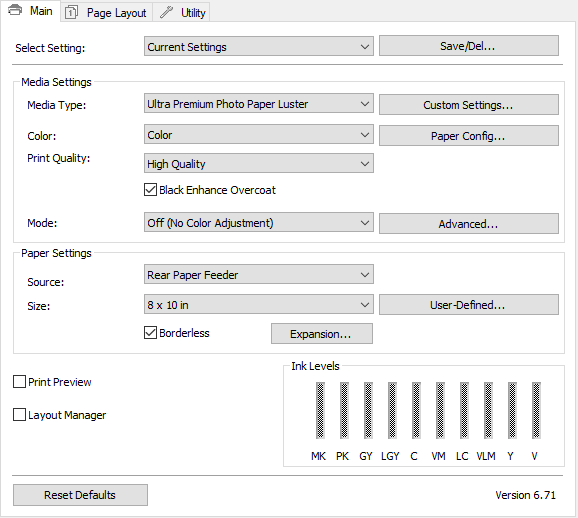
The printer driver's main tab is similar to other Epson printers from the last few years. From this tab, you control the media type, color mode, print quality, paper source, paper size, and advanced paper handling options.
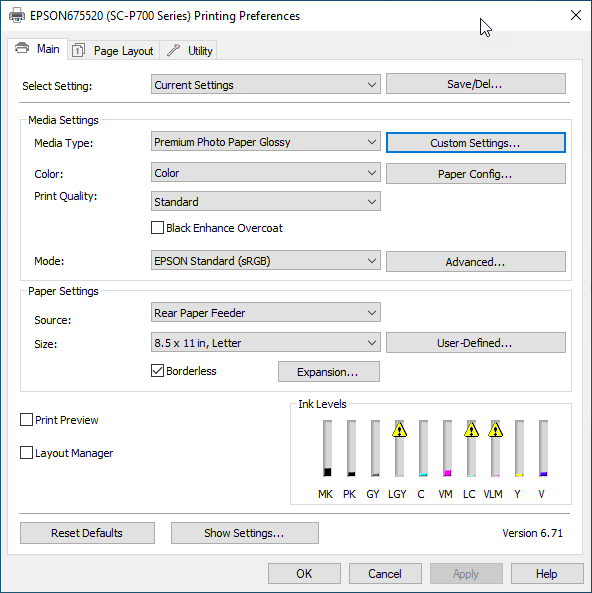
The driver also includes a Print Preview option. This is separate and not connected to the preview already displayed by Photoshop, Elements, and Lightroom. Do not use the driver's preview. In many cases, it will interrupt the color management process if you are using ICC printer/paper profiles.
Media Type
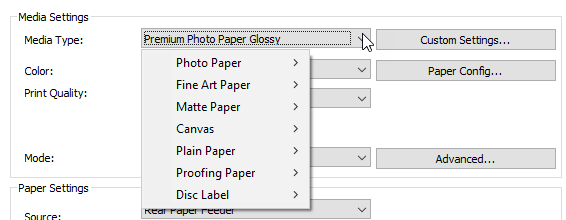
With each print, you must designate the type of inkjet paper (media) that you are using. You can think of media type as part color profile and part ink throttle. Different inkjet papers need different amounts of ink to perform correctly, and this is where the media setting becomes important.
Even if you are using ICC color profiles, you need to choose the right the media type. The correct choice will be included with your profile's instructions. It is important to note that the drop-down menu at right is a fixed list and only contains Epson media names. When using non-Epson papers, you are going to choose the closest media type.
Quality Options
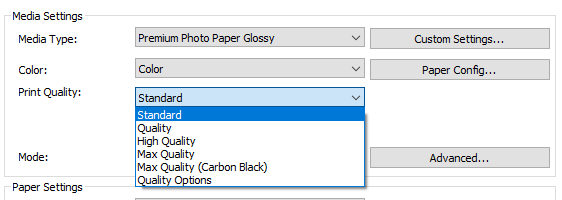
To get to this menu, go to the Print Quality drop-down and choose Quality Options. We recommend using this menu so you can verify the print quality setting.
Quality Options
Print quality choices for Photo Papers
- Level 1 Superfine - 1440x720
- Level 2 (Quality) Superfine - 1440x720
- Level 3 Photo - 1440x1440
- Level 4 SuperPhoto 5760x1440 (Borderless printing not supported)
- Level 5 SuperPhoto Carbon Black 5760x1440 (Borderless printing not supported)
Print quality choices for Matte Papers
- Level 3 SuperFine - 1440x720
- Level 4 Photo 1440x1440
- Level 5 SuperPhoto 5760x1440
Print quality choices for Fine Art Papers
- Level 4 Photo 1440x1440
- Level 5 SuperPhoto 5760x1440
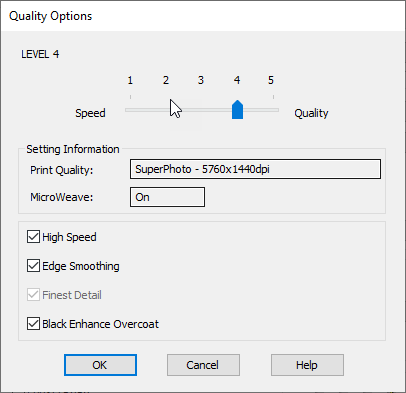
The High Speed option puts down ink each time the print head passes over the paper. Turning High Speed off means the print head only puts down ink in one direction. For most, high speed yields excellent results. For even better quality, turn high speed off if you see fine banding that runs parallel to the print head path.
The Edge Smoothing option is for optimizing the appearance of low-resolution images by smoothing jagged edges and lines. For best image quality, you should turn this feature off and instead make your files 300ppi resolution.
Finest Detail will appear when you choose Plain Paper. Sharpens edges on vector-based data, including text, graphics, and line art. (This setting does not affect photographs.)
New to the P700 is Black Enhance Overcoat. According to Epson, the Mode uses existing Light Gray ink. There is no “flood” coat ink usage- Light Gray is used only where necessary. Prints darker tones of black by overcoating the black ink with gray. According to the P700 manual, printing with Black Enhance Overcoat increases the edge margins. Select Quality Options > Minimize Top Margin to reduce the size of the margins. This may lower print quality and may cause paper that curls easily to rub against the print head.
Mode
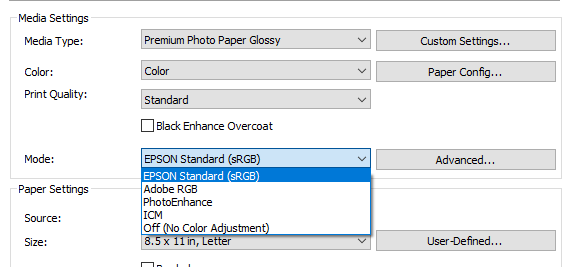
This drop-down controls printer color management. The first three (EpsonStandard (sRGB), Adobe RGB, and PhotoEnhance) are Epson color management options.
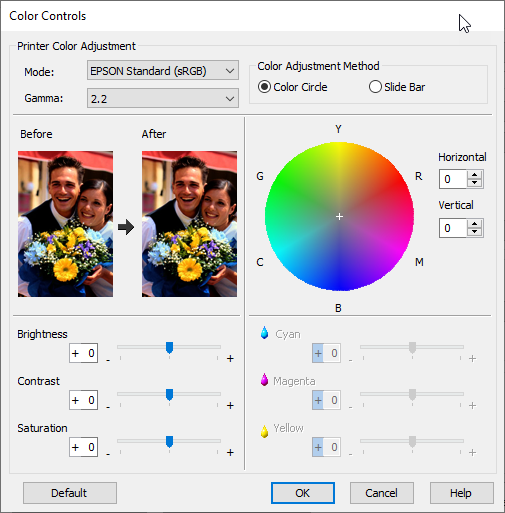
Using the three color modes, the Color Controls menu is available by clicking the Advanced button. Here you can adjust:
- Brightness
- Contrast
- Saturation
- Color adjustment - available as a color wheel or slider adjustments
By using these controls, you can adjust output independent of your imaging software edits. The controls are not available when using ICC paper profiles.
ICM Mode is rarely used and runs color management through the Windows OS.
Select Off (No Color Adjustment) mode when using ICC paper profiles. It shuts down the printer's color management engine and puts your editing software in charge of color output.
Paper Configuration
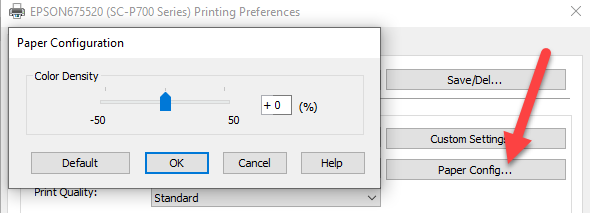
The P700's paper configuration control slightly increases or decreases the amount of ink used independently of the media setting or paper profile. It can be useful with light-weight media prone to warping, where a decrease in ink usage will minimize warping.
Paper Configuration also contains the most striking change to the driver. Gone are Paper Thickness and Platen Gap control. In previous models, they were critical to successful printing on thick media. The printer manual implies that thickness adjustments are now controlled by media type selection. It is also apparent that paper thickness ranges are prebuilt into the paper feed paths. Overall, if this system works, it will save time and minimize print problems caused by thicker media.
Color Density
The Color Density control acts to fine-tune ink usage. If you encounter a paper that warps or buckles under heavy ink loads (this is usually image dependent), try setting Color Density to minus 10. It will typically help with control warping and will not degrade image quality.
The Drying Time per Print Head Pass is not often needed. We recommend increasing dry times for metals, translucent media, and materials you've coated by hand.
Paper Settings: Size
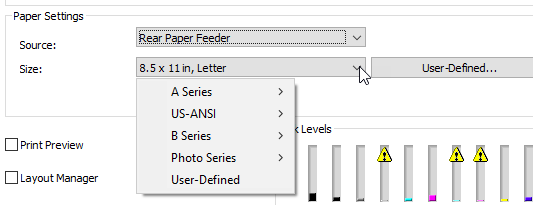
The Windows driver comes with a variety of preset paper sizes, listed below:.
- 3.5 x 5
- 4 x 6
- 5 x 7
- 5 x 8
- 4 x 7.11
- 8 x 10
- 8.5x11
- 8.5x14
- 5.5x8.5
- 11x17
- 13x19 (Super B)
- A3
- A4
- A5
- A6
- B4
- B5
- 10x12
- 11 x 14
- 12 x 12
- 13 x 19
Borderless Printing Sizes - The P700 allows these pre-defined sizes to be printed without borders:
- 3.5 x 5
- 4 x 6
- 5 x 7
- 5 x 8
- 4 x 7.11
- 8 x 10
- 8.5 x 11
- 10 x 12
- 11 x 14
- 11 x 17
- 13 x 19 (Super B)
- A3
- A4
Borderless Printing Media Types - The P700 allows these media types to be selected for printing without borders:
- Epson Brochure & Flyer Paper Matte Double-sided
- Epson Ultra Premium Presentation Paper Matte
- Epson Premium Presentation Paper Matte
- Epson Premium Presentation Paper Matte Double-sided
- Epson Ultra Premium Photo Paper Glossy
- Epson Premium Photo Paper Semi-gloss
- Epson Ultra Premium Photo Paper Luster
- Epson Velvet Fine Art Paper
- Epson Watercolor Paper Radiant White
- Epson UltraSmooth Fine Art Paper 325 gsm
- Epson Premium Photo Paper Glossy
- Epson Photo Paper Glossy
Paper Settings: Source
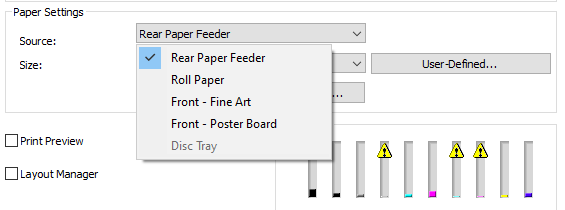
Source refers to the paper path you wish to use. The default is Rear Paper Feeder. Other options include Roll Paper, Front-Fine Art, and Front-Poster Board.
Front-Fine Art and Poster Board options activate the front single sheet, flat path.
Front-Poster Board allows the printer to accept media up to 50 mil (1.27 mm) thick.
Size Limitations by Source
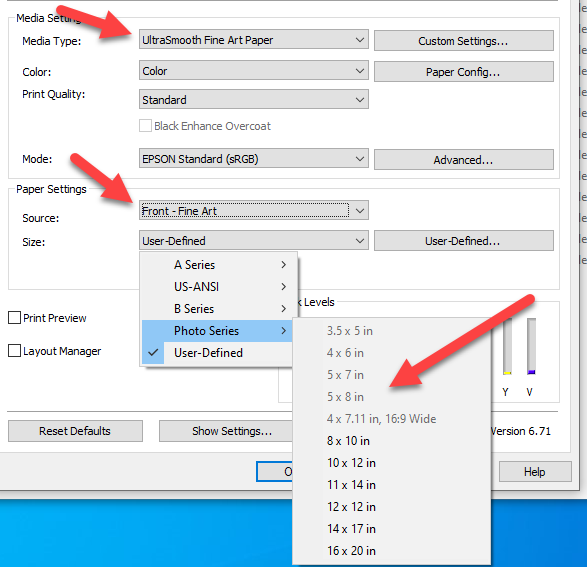
Note that the driver limits the sizes you can use when Front and Roll source is selected.
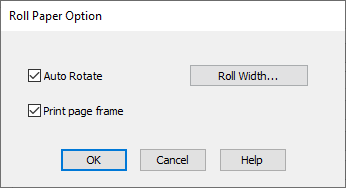
Roll Paper Options has two
User Defined Paper Sizes
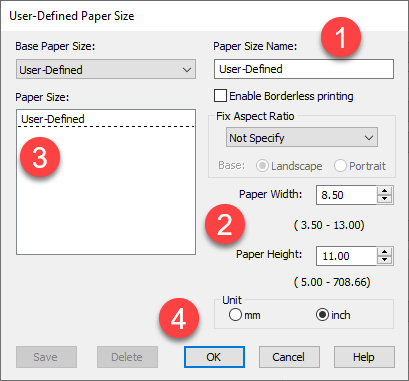
Like other Epson printers, the P700 allows you to define custom paper sizes. The dialog has three main controls:
1 - You can name each size you defined
2 - Paper width and height defined
3 - Listing of all previously defined and saved sizes
4 - Units - inches or millimeters
Epson sets min and max values for width and height:
Paper Width: 3.5" - 13.00"
Paper Height: 5" - 708.66" (page length is limited by file size)
Custom Borderless Option

You can define limited custom sizes to print without borders. Borderless width choices are preset at the factory and are chosen from a drop down-menu. Paper height (length) is user-defined from 5" to 708.66" (page length is limited by file size)
This feature opens fun opportunities for printing borderless greeting cards as well as pano and landscape prints.
Borderless Greeting Cards
You can now print Red River Paper's 7x10, 8.5x5.5, and 8x9 Pano cards without borders. Instructions for Setting up these Custom Borderless Sizes.
Pano and Landscape Prints
You can now print stunning borderless panos and landscape images on Red River Paper's 13" x 38" and 8.5" x 25" Flat Sheets.
Page Layout
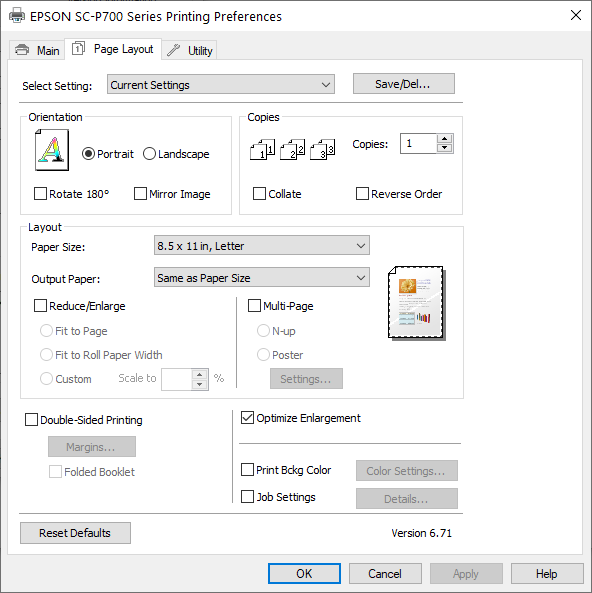
The page layout tab is like most other Epson printers. Print orientation, number of copies, layout options, and a host of other features we'll probably never use!
Job Settings
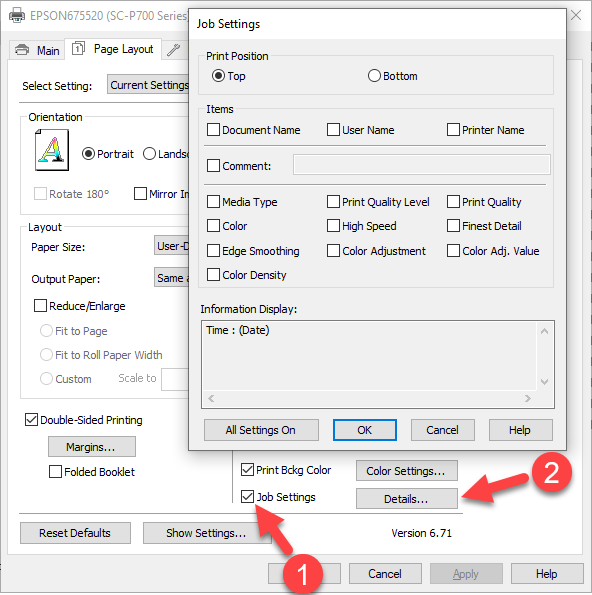
One interesting new option is the Job Settings feature. By checking the Job Settings box then clicking the Details button, you will be presented with the menu below.
Your print will then contain all of the information you've selected. As you can see below, the detailed information fits nicely at the top.

For those who like to record settings for future use, or just want to know what settings work, Job Settings should be a welcome addition.
Utility Tab
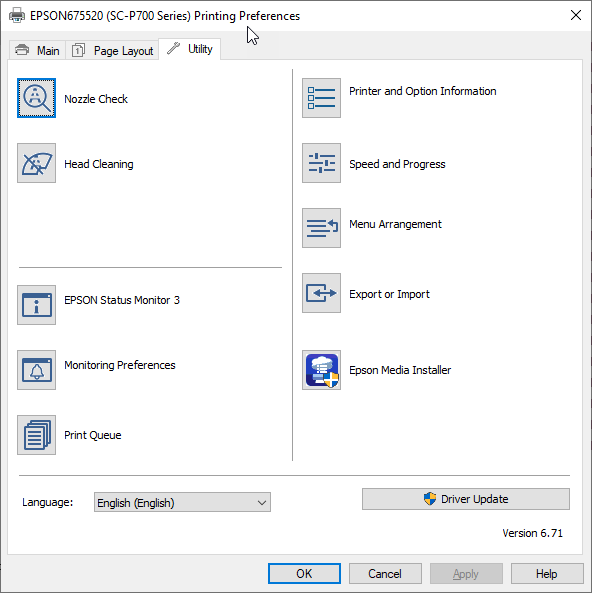
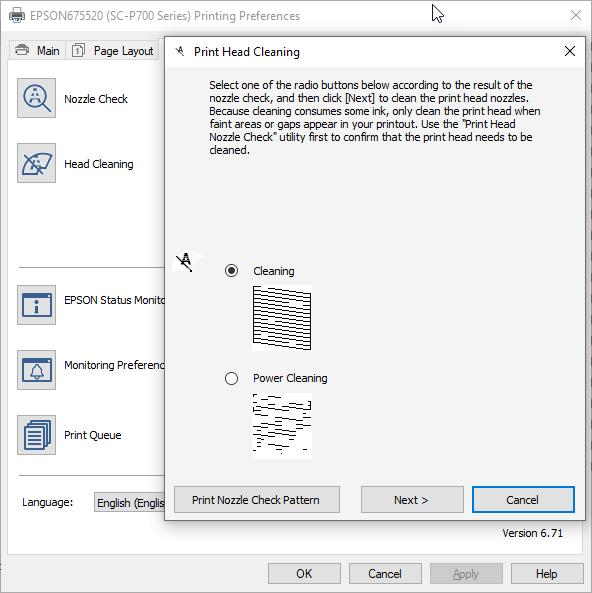
You should come to this tab often to perform routine printer checks and maintenance. The Nozzle Check, Head Cleaning, and Print Head Alignment are critical tools to have it you experience a drop in print quality.
You can quickly bring up the print queue in case you need to check on a job. And Epson allows you to move printer driver controls around using the Menu Arrangement feature.
The Driver Update button performs a quick check with Epson to see if you have the latest software. An internet connection is required for this feature.
Custom Settings
Use Custom Settings to memorize driver setting combinations. This is a well designed time-saving feature we highly recommend.
In the above example, media type, color option, print quality, mode, paper source, paper size, and borderless option are set.
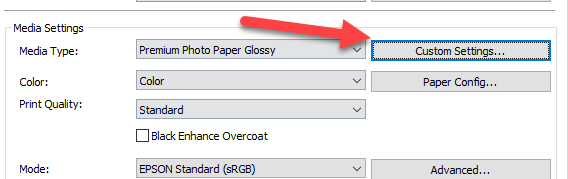
When you are ready to save the above combination, click Custom Settings.
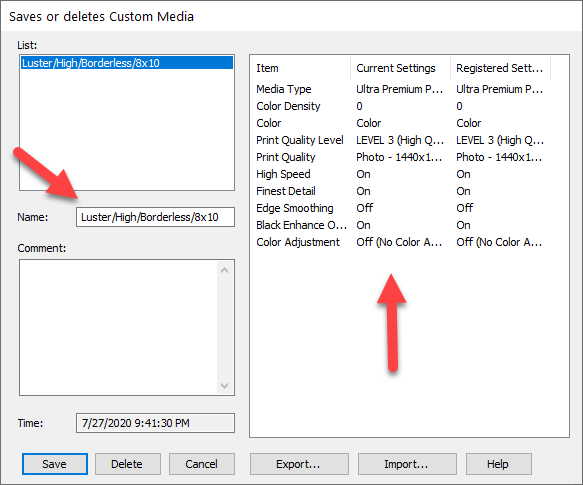
In the Save or Delete Custom Media dialog, you will see your setting listed on the right.
Enter a name for your setup and then click Save.
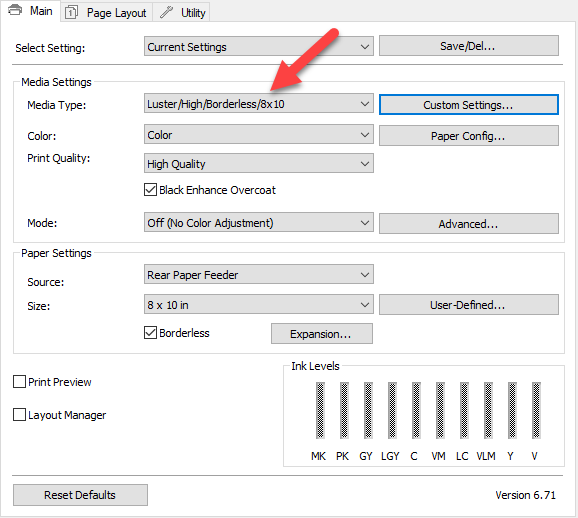
Back at the Main tab, your saved and named combination is now selected in the Media Type drop-down.
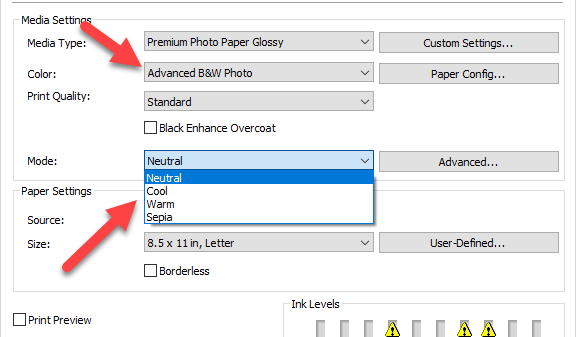
Advanced Black & White
The P700 has three black inks available for your printing needs. Using the Advanced Black & White (ABW) mode, the P700 blends these inks to create a neutral black & white image. The system can also create toned grayscale images from cool, to warm, to sepia.
Access to the ABW mode starts in the main menu under the color option. See below.

When ABW is chosen, the Mode drop-down changes as seen below. This is the quick method of using ABW for quick neutral or tones images.
ABW Details
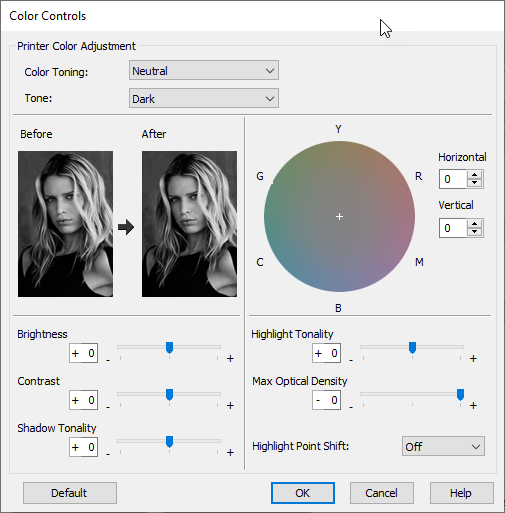
For more detailed adjustments, clicking the Advanced button above brings up the Color Controls menu for ABW.
A number of variables are available, including a color wheel for precise toning work.
However, any changes to these settings cannot be soft-proofed from when printing directly from Photoshop, Lightroom, and other similar programs. You can see an ABW soft-proof by printing from Epson Print Layout, a stand-alone image printing program.
Related Posts and Information
Last updated: February 10, 2025


