We could all stand a little less IRS in our lives. You might find it funny that an inkjet paper company admits to this phenomenon, but the print process could be more straightforward. However, if you keep a few simple tips in mind, you'll find printing becomes more consistent and a natural part of your photographic life. In the end, Inkjet printing is fun, rewarding, and saves you money over larger lab prints.
1) Let Your Prints Dry Before Evaluation
Inkjet prints are dry to the touch when leaving your printer. That does not mean they are totally dry. The ink's carrier fluid takes time to evaporate fully. During that time, you may notice the colors and saturation of your print will change. For this reason, you should give your print at least an hour to rest before making a quality judgment. Dye inkjet prints will shift more over time than pigment, but we still recommend a waiting period for all prints.
2) Evaluate Prints in the Right Light
Your inkjet print requires plenty of light for proper evaluation and critique. Too little light reflected from a print will make it look dark. Go to a brightly lit room, a covered porch in the daylight, or use a color-balanced light source. Try to view the print in light, similar to where it will be displayed. If you're hanging a print in a darker area, it's perfectly OK to adjust the file's brightness/exposure to compensate. Remember, you're printing to look good, and making edits to accomplish that goal is usually necessary.
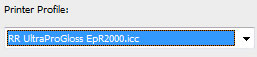
3) Check your profile selection and driver settings each time to click "Print"
Sometimes photo software and printers remember your last setting, and sometimes they don't. Even if you just made a print and want a duplicate, check those settings! Your IRS level will spike if you grab that next print and everyone in the frame looks sunburned because of a color management error!
 |
 |
| Check you select the right profile
|
Verify the media setting matches the profile instructions
|
4) Make small test prints first

Have some 4x6 or 5x7 sheets of your favorite photo paper on hand. Resize your image briefly and print it. You'll get a feel for any corrections you need to make or for any problems that arise during the print process. Once you're satisfied, you can commit the ink and paper to a full-size print.
5) Choose Your Quality Level Wisely
The highest quality setting your printer offers may not be the best choice for your prints. The top-quality choice may not look much better than the next level down. What you will notice is a much slower print speed and increased ink usage. Try this: print one at top quality and another at a step-down. Now ask five people if they can tell the difference. We bet most will not.
Here are some quality settings we avoid:
Epson Best Photo RPM
Canon quality setting 1 on their pigment ink models
HP Maximum DPI
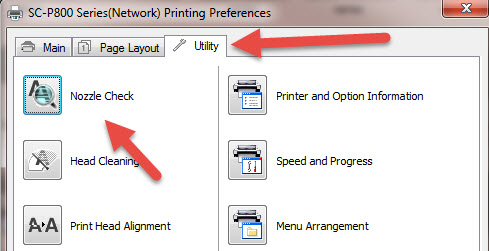
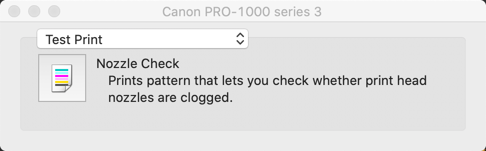
6) Run a Nozzle Check Before Your Print Jobs
Some plain paper and 30 seconds, that's all it takes. But this little test print can tell you a lot. Even a few blocked ink nozzles can cause lines on the print or color consistency problems. You'll find the nozzle check feature on Epson and Canon printers, usually on the Maintenance Tab, Utility Tab, or in the System Preferences menus.
 |
 |
| Windows - Utility Tab in driver |
Mac - From system preference |
7) Keep an ink usage log
Knowing which inks you use most often will help you keep the right colors on hand. You'll also avoid having 12 green ink tanks lying around when it comes time to retire the printer! Red River Paper makes that easy with our free Ink Use Log spreadsheets for several popular inkjet printers. You'll also find logs for "generic" four- and six-color machines. Each time you change an ink cartridge, mark it on your spreadsheet, and over time, you'll see which tanks are used most.
Related Posts and Information
Last updated: March 17, 2026


