
Introduction
The Epson SureColor P700 was released in June 2020. It is the successor to the Epson SureColor P600. The P700 is a 13" wide enthusiast-to-professional level photo and fine art inkjet printer featuring ten individual ink cartridges now called the "UltraChrome PRO10" system. The PRO10 system is pigment-based and uses six colors, two grays, and a black ink. The big news is that the P700 now has dedicated ink channels for Photo Black and Matte Black inks and eliminates the need for black ink switching. Pigment inks are designed to be stable over long periods of time, allowing prints to be displayed (under proper conditions) for many decades. The P700 descends from a long line of top-quality pigment-based photo printers. Building on that lineage, Epson claims that the P700 has increased performance relative to last generation printers.
Points of Interest
- Dedicated ink channels for Photo Black and Matte Black. No black ink switching.
- Addition of violet ink.
- Light blacks inks now called gray.
- Epson claims up to 6% wider color gamut.
- Epson claims 5% increase in DMAX compared to previous gen printers using "Carbon Black" mode.
- Color touch screen with intuitive controls.
- No dedicated Gloss Optimizer. Feature built into the Light Gray ink.
Quick Links
- Unpack and Prep
- Ink and Driver Installation
- Connectivity
- Paper Feed Options
- Printer Software Tour
- Print Speed and Results
- Print Quality
- Black & White Performance
- Conclusion
Just the Facts
13" Wide photo & fine art quality inkjet printer
Can print 3.5" x 5" up to 13" x 550" banners
Ten Colors - Cyan, Yellow, Vivid Magenta, Vivid Light Magenta, Light Cyan, Violet, Gray, Light Gray, Photo Black or Matte Black
Printing Technology - Advanced Micro Piezo® AMC print head with ink-repelling coating technology, 10-channel, drop-on-demand, inkjet print head
MSRP $799
Ink Cost - About $37.99 per tank (25 mL capacity)
Rating - A "strong buy" for photo & fine art printing needs, especially for those who enjoy black & white printing.
Unpacking and Prep

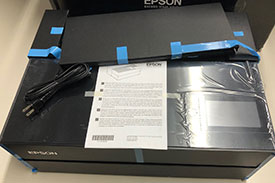
The Epson P700 shipping box includes:
- Printer
- Initial Ink Cartridges
- User Guide Kit
- Power Cord
- CD / DVD Disc Tray
The printer ships wrapped in plastic sheets and anything that opens or moves is secured with tape. A USB cable is not included.
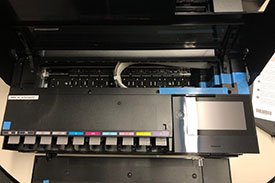
Ink Install


The P700 comes with a starter set of inks. Installation is straightforward. The cartridges fit into a bay on the front left of the printer. Accessed to the bay is by lifting the top lid of the printer. Hoses connect the ink tanks to the print head.
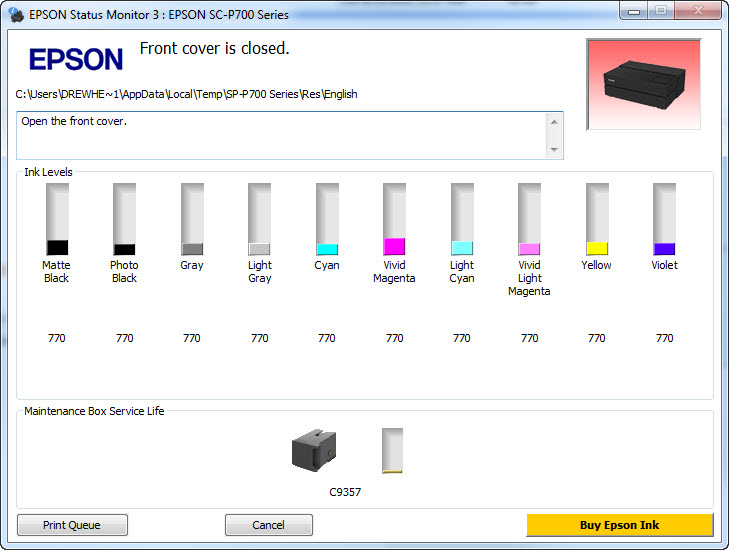
When the printer is primed and ready to print, the inks showed a bit less than 25% full. You will notice the maintenance tank is almost full at the end of the process.
Epson P700 Ink Cartridges
- Violet (T770020)
- Cyan (T770220)
- Vivid Magenta (T770320)
- Yellow (T770420)
- Light Cyan (T770520)
- Vivid Light Magenta (T770620)
- Gray (T770720)
- Matte Black (T770820)
- Light Gray (T770920)
- Photo Black (T770120)
Maintenance Box


The maintenance take, Epson called it the Maintenance Box, collects waste ink from cleaning cycles and borderless over spray. The printer comes with two. The first will be filled to about 75% capacity during setup. Afterwards, tank usage slows considerably. The maintenance tank is installed behind a small door on the right side of the printer. It retails for $20.00.
Driver Install
Driver installation and setup were straightforward in Windows and the Mac OS. Installation begins by going to www.epson.com/support/p700. After the driver package installs, you will turn the printer on and then connect it to your computer or start the WI-FI connection.
Connectivity
The P700 can connect using three methods:
- Hi-Speed USB 2.0
- 100Base-T Ethernet
- WiFi - 2.4 and 5 Ghz
Wireless LAN
- Standard: IEEE 802.11b/g/n
- Security: WPA-PSK (TKIP/AES) WPA2 compliant, WEP (64/128bit)
- Frequency Band: 2.4 and 5 GHz
- Communication Mode: Infrastructure mode, Ad hoc
You can also connect the P700 to Google Cloud Print and Apple AirPrint.
Paper Feed Option
The P700 has three paper feed options:


The P700 no longer has Platen Gap or Media Thickness settings in the driver. However, there is one buried in a printer panel submenu - see below. The printer manual implies the thickness setting is based on media setting in the driver and the paper path chosen. Some Epson literature describes the top load path as a "Single top load tray for all paper - no need for a second fine art tray." It seems that fine art papers, cotton, and baryta products, can be fed through the top tray. However, the user guide suggests the top tray is for standard papers that go up to about 11 mil thickness. It recommends the front paper feeder for thick and heavy Epson branded products. Given the mixed message, we will use the front path for papers 13 mil and thicker as a precaution against head strikes.
Top-Loading Tray
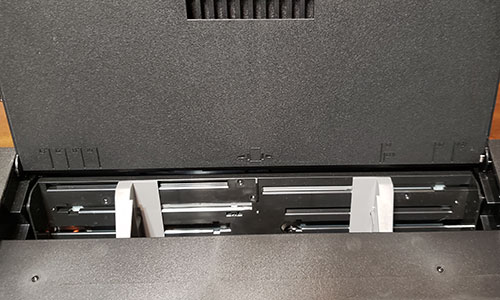
The top tray can hold 1-30 sheets of paper, depending on the thickness of your media. Epson's literature describes it as a "Single top load tray for all paper - no need for a second fine art tray." You will move the gray guides in or out based on the paper size. Make sure these barely touch the paper and do not put any pressure on the sheet. A plastic grate extends up from the tray door to support larger sizes.
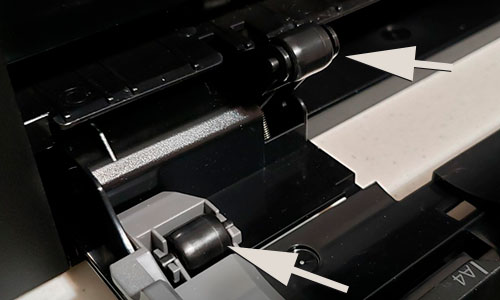
The P700 now loads paper from the center of the tray. The feed roller is also located on the center point of the printer. Canon uses this design and their printers are consistently better at feeding heavy / thick media from the top tray. Time will tell if Epson's decision to follow Canon's design will improve performance.
Epson, we have a problem
Our experience with the top-load tray was not good. It consistently failed when loading more than a few sheets of luster (satin) or glossy paper into the tray. Bear in mind printers like the P700 are designed around this type of paper. Luster and gloss are by far the top selling paper types. Everyone knows this. The P700 should be able to accept 30 sheets of luster or gloss and feed them without any error. We understand and defend a mechanism that might fail with a heavy cotton or some exotic media. That's what the front-load path is for. However, something is clearly wrong with the top feed mechanism design. To make it more vexing, some users report problems feeding a single sheet and others report no problems at all. Epson is likely to replace a P700 if you call and report a poor experience.
Does the problem make the P700 a bad choice? Nope. If you're an Epson adherent, want the best possible B&W output, or find the other P700 features alluring, then you'll just have to deal with the kooky design error. Just don't expect the P700 to be a high volume printer if your copy happens to have this problem.
Single-Sheet Front Loading Path for Thick Media and Poster Board
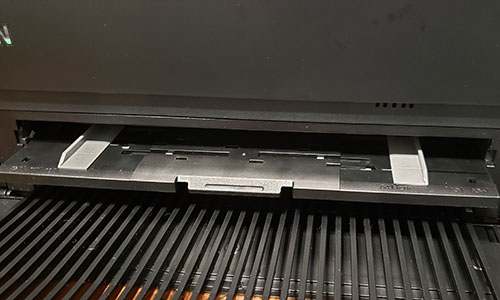
The front single sheet path is for thick media, fine art papers, and poster board. We recommend this path for papers 13 mil and thicker. The P700 can accept board up to 1.27 mm (50 mil). The path is activated by pulling a tab above the output tray. A tray will extend and lower, and the touch screen panel prompts you to begin the load process.
Roll Feeding
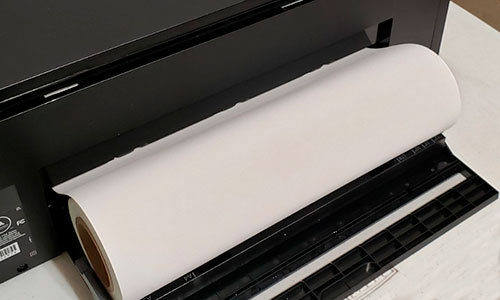
The P700 can use 13" wide rolls with a 2" or 3" diameter core. The tray indicates the printer can accept roll widths of 8.5", 10", 11", 12", and 13".
A drop down adapter on the back of the printer supports rolls. Unlike previous models, there are no core adapters to hold the roll in place. Instead, it sits on top of two rollers. Rollers on arms that extend from the back of the machine keep rolls in place and on-track. The design works remarkably well and saves a good deal of space usually required by a roll adapter.
Printer Driver Tour

Get an in-depth view of the software-based controls for the Epson P700.
Printer Screen Displays
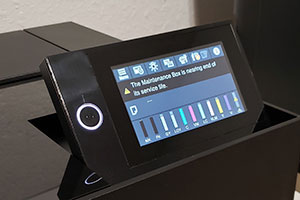
New to the P700 has an improved touch screen display that can be angled for easy viewing while standing. The panel controls several printer features. Among them:
- Paper loading setup
- Ink level display
- Maintenance functions
- Wi-fi setup and control
You will find some useful settings and tools.
Paper Setting
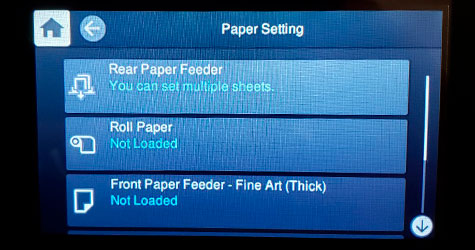
Paper Setting has two steps. The first allows you to choose among the paper feed paths. The second step is to designate paper type and size. Bear in mind if you follow our recommendation below, the printer driver will override these second-level settings.
Thick Paper Setting
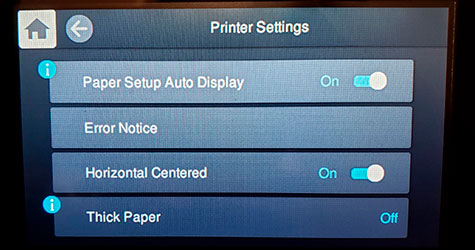
The "Thick Paper" setting is located at Menu > General Settings > Printer Settings. As discussed above, there is some mixed messaging about which paper paths are for thick paper. We will use the front path for papers 13 mil and thicker as a precaution against head strikes.
Paper Mismatch and Paper Meandering
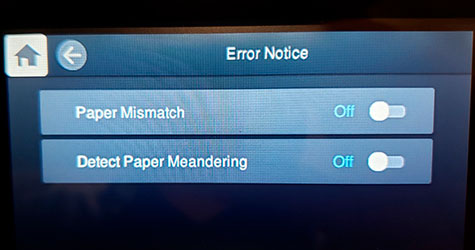
Verify that Paper Mismatch is turned off. This ensures your driver settings do not need to match the media and size options in the Paper Setting menu. It will override the printer's settings and avoid unnecessary delays.
Located in Menu > General Settings > Printer Settings > Error Notice
Now called Paper Meandering, Epson used to refer this option as "Paper Skew Check". In any case, it is important. Simply put, sensors stop the print process if they determine the paper is not square in the feed path. Our experience is that the system is overly sensitive. It can register an error even when you may not be able to perceive any skew. Verify it is turned off and leave it off.
Located in Menu > General Settings > Printer Settings > Error Notice
Custom Borderless Capabilities
Like previous Epson models, the P700 allows borderless printing for some custom sizes. Borderless widths are chosen from a fixed menu in the Windows driver. The Mac driver does not display the available sizes or clear instructions on their use. We explain the process in the Mac driver tutorial linked below.
Learn more about the feature:
Print Speeds and Results
Quality Settings
Print quality choices for Photo Papers
- Level 1 Superfine - 1440x720
- Level 2 (Quality) Superfine - 1440x720
- Level 3 Photo - 1440x1440
- Level 4 SuperPhoto 5760x1440 (Borderless printing not supported)
- Level 5 SuperPhoto Carbon Black 5760x1440 (Borderless printing not supported)
Print quality choices for Matte Papers
- Level 3 SuperFine - 1440x720
- Level 4 Photo 1440x1440
- Level 5 SuperPhoto 5760x1440
Print quality choices for Fine Art Papers
- Level 4 Photo 1440x1440
- Level 5 SuperPhoto 5760x1440
The 8" x 10" test image was printed at four quality settings using - Premium Photo Paper Glossy, High speed ON, Black Enhance Overcoat ON, Edge Smoothing OFF.
Prints were made from Photoshop / Windows 10 / Direct USB connection.

| Print Quality | 4x6 | 8x10 | 13x19 |
|---|---|---|---|
| Level 1 1440 x 720 | 1:05 | 2:17 | 6:01 |
| Level 3 1440 x 1440 | 1:20 | 2:55 | 7:54 |
| Level 4 5760 x 1440 | 4:00 | 7:25 | 14:10 |
| Level 5 5760 x 1440 CarbonBlack | 6:10 | 11:27 | 22:12 |
Print Quality Comparisons
Prints of the test image were made at different quality levels then scanned at high resolution.
Click here for the Epson P700 print quality comparisons.
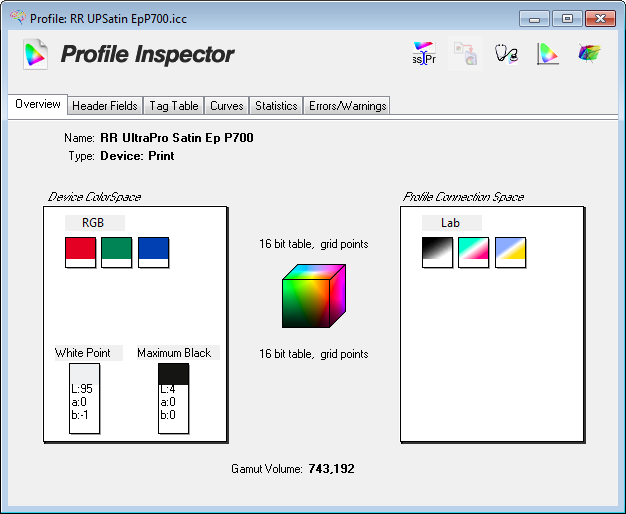
Color Gamut Trivia
The profile data from the P700 and the printer it replaced, the P600, were compared using the Color Think Pro app. Gamut Volume is a generalized way to understand a printer's color gamut.
| Paper | P700 Gamut | P600 Gamut |
|---|---|---|
| UltraPro Satin | 743,192 | 731,662 |
| Polar Matte | 719,828 | 695,811 |
| Palo Duro SoftGloss Rag | 817,664 | 823,367 |
| Aurora White | 711,143 | 680,337 |
Gamut volume for P700 profiles is consistently higher than the P600. While not a definitive marker that the new printer makes better prints, it indicates the P700's ink set is capable of a broader range of colors than the P600.
Carbon Black Mode
Carbon Black mode is new to the P700. Epson claims a 5% increase in DMAX (the darkest black value) compared to the Epson P800. Print quality level 5 activates the feature for glossy, photo metallic, and luster media. For a simple evaluation of the new mode, the same image was printed on UltraPro Satin at quality levels 3, 4, and 5. See above for details on the quality levels. The prints were allowed to dry for eight hours then displayed in line under a balanced light source. Several people were asked to evaluate and rank them in order from the weakest to the darkest black. In most cases, they were able to discern the differences well enough to label each print accurately.
Print Comparisons


The print on the left is quality Level 3, and the right is print quality Level 5 Carbon Black.
Through monitor inconsistency makes a detailed comparison difficult; the difference in black density should be reasonably clear.


The print on the left is quality Level 4, and the right is quality Level 5 Carbon Black. In-person, the difference is noticeable but to a much smaller degree.
LAB Color Value Comparisons
A L*a*b* reading was taken from the same area of each print using an X-Rite i1 Pro 2 spectrophotometer. For more on LAB values, check out this brief article from X-Rite.
The most important information comes from the L* value - the closer to zero, the darker the color. When A and B values are also near zero, you are looking at a shade of black.
Quality Level 3
L* = 4.1
a* = -0.1
b* = -0.4
Quality Level 4
L* = 3
a* = 0.0
b* = -0.4
Quality Level 5
L* = 2.7
a* = 0.1
b* = -0.2
To sum it up, the new Carbon Black mode delivers excellent black density. The choice to use it is yours given the long print times (see above) and increased ink usage.
Black & White Performance
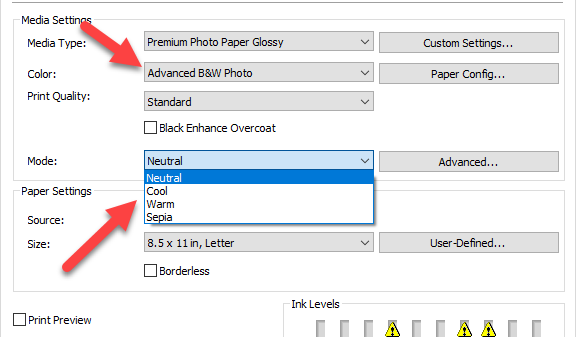
The Epson P700, like several printers before it, can print with three black inks - Photo or Matte Black plus Gray and Light Gray. Using the printer driver's Advanced Black & White (ABW) mode, the three blacks are used together, though not exclusively, to make a print. The ABW system can produce truly neutral grayscale prints. Since this is a driver-based system, no ICC printer profiles are required.
In addition to neutral, the ABW driver has choices for cool, warm, and sepia-toned prints. Using the ABW advanced feature allows for fine-tuning of tone, brightness, contrast, and more. However, any changes to these settings cannot be soft-proofed from when printing directly from Photoshop, Lightroom, and other similar programs. You can see an ABW soft-proof by printing from Epson Print Layout, a stand-alone image printing program.
If you are printing a toned B&W image and want to replicate that tone with ease, print the file using a printer color profile instead of the ABW system. Keep in mind the file must be converted to B&W in your photo software before printing. Using a profile will more accurately reproduce the desired tonality when printed.
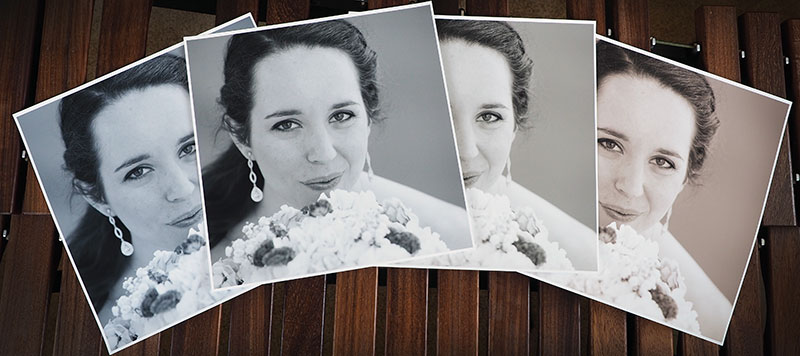
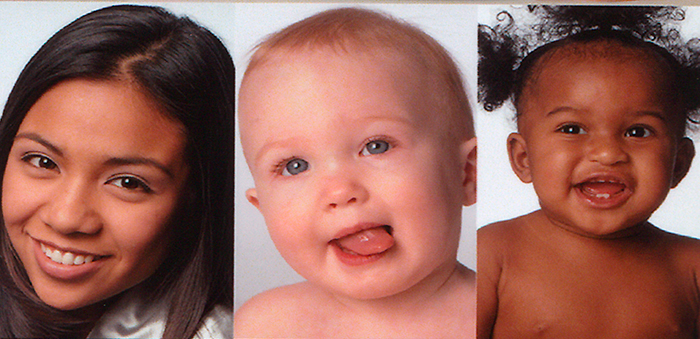
Left to right: Cool, Neutral, Warm, Sepia
Above is an example of the ABW system at work. The original image is a color photograph.
Conclusion
The P700 is another example of why inkjet printing is a powerful tool for photographers, artists, and designers. With this affordable and relatively easy to operate machine, you can create or reproduce works to sell, display, or share.
The P700 represents further honing by Epson of well-established technology. Photo inkjet printers have become so good it is difficult to see how they can become noticeably better. The typical prosumer and pro-level printer can easily match and arguably exceed photo lab quality. However, these P700 improvements are undoubtedly important and worth noting:
- No PK/MK swap required
- Intuitive color touch screen printer panel
- Simplified front media path
- Carbon Black mode does achieve noticeably darker blacks
- Gloss optimizer integrated into Light Black for smoother and more accurate application
In summary, the P700 is a clear winner and excellent all-round choice for the photographer, artist, or designer looking to make their own professional-quality prints.
Epson P700 Compatibility with Red River Paper Products
Red River Paper offers over 30 professional-grade inkjet papers for use with the Epson P700. We print on each paper to verify the print quality and provide custom profiles for more consistent and accurate results.
Related Posts and Information
Last updated: January 27, 2025


