A beginning note: This tutorial uses lots of screenshots
to help you understand the process better. If you have a dialup connection,
each page may take up to a minute to load fully.
There are many ways to set up and print a greeting card using Photoshop.
This tutorial offers a "Photoshop as a layout tool" approach to greeting
card printing.
If you think of the canvas you will make as the unfolded card (outside
or inside), then learning where to place images, text, borders, etc.
will be very easy
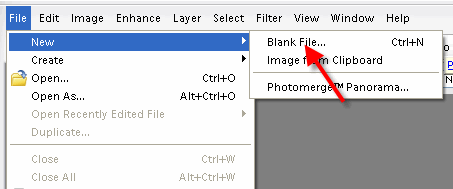
First, start with a blank canvas. Click the File Menu and Choose
New.
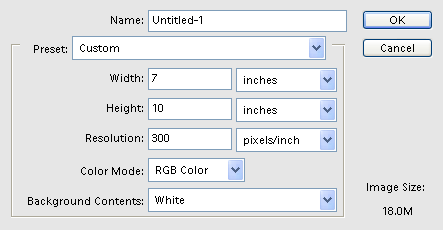
Make a new canvas based on these size rules:
Paper Size
New Canvas Size
7x10
10" h x 7" w
6.25x9
9" h x 6.25" w
5.5x8.5
8.5" h x 5.5" w
We recommend Resolution be set to 300ppi
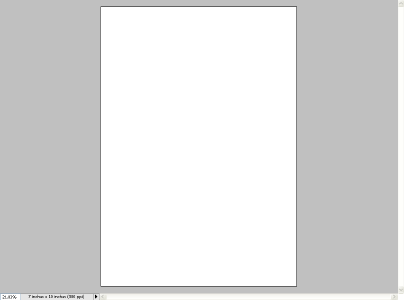
Your blank
canvas for a portrait (vertical open card) orientation greeting
card will look like this.
The lower half of the page
will be the outside front of the card. The top half is the outside
back.
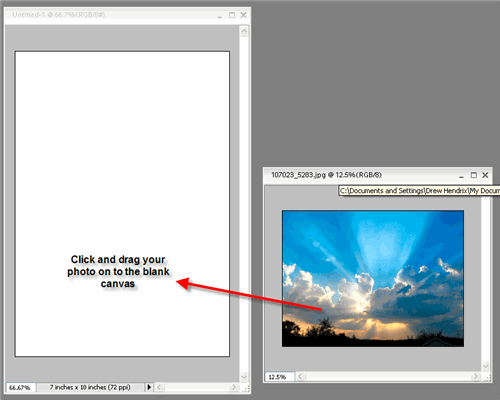
Next, open the image(s) that
you want on the front of your card. You can prepare images beforehand
with borders or other special effects like the flower image at right.
Or, you can open a simple unaltered image for placement on the card.
NOTE! Remember that our cards have a maximum image area that can
go on each side without any cropping. Check this chart for the rules:
Card Size
Max Image Area
7x10
4.75" h x 6.75" w
6.25x9
4.25" h x 6" w
5.5x8.5
4" h x 5.25" w
Make sure you crop or otherwise size your images within these
contraints.
Now, use the Move tool and
drag images onto the blank canvas you created in the step above.
They will come into the blank document as new layers.
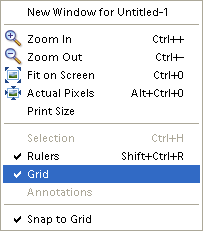
Special
Note on PHOTO POSITION
Because Elements
does not feature the guides tool, you can either "eyeball" the
position of your image on the card or use the GRID funtion. Because you are working with
a photo on a layer, you can put the photo anywhere
on the card you like - especially if you have text
or other graphics to include.
Example
of a finished card
On the screen shot at left, the bottom is the
outside front of your
card
while
the blank area is the outside back.
To make more customizations, drag more images onto the canvas
or add text and borders like the example at left.
NOTE! All text and image on the outside back of the card MUST be UPSIDE
DOWN in your layout to print correctly. Click for help with this subject
Remember that you will end up with no less than a 1/8" border
on all sides of the card.
I have been buying paper products from this company for a number of years. I bought a batch of card stock on Sunday at the regular price. I am not a person who is up on all the sales that take place. But in the morning I received an email telling me about the Happy Cyber Monday!
I called the office to ask for a refund of the difference. Well guess what NOPE. I can return the product and buy this today but no return of the difference. WELL RED RIVER THIS IS MY LAST ORDER WITH YOU!!!! THIS IS NOT A GOOD BUSINESS PRACTICE. How hard is it log in on the computer and credit a couple of bucks to my account. It sure is a lot easier then dealing with the return and re sending the product again..CRAZY CRAZY..
Papers with the Archival designtation can take many forms. They can be glossy, matte, canvas, or an artistic product. These papers are acid free, lignin free and can be made of virgin tree fiber (alpha cellulose) or 25-100% cotton rag. They are likely to have optical or fluorescent brightening agents (OBAs) - chemicals that make the paper appear brighter white. Presence of OBAs does not indicate your image will fade faster. It does predict a slow change in the white point of your paper, especially if it is displayed without UV filter glass or acrylic.
Archival Grade Summary
Numerous papers - made from tree or cotton content
Acid and lignin free base stock
Inkjet coating layer acid free
Can have OBAs in the base or the coating
Museum Grade Paper
Papers with the museum designation make curators happy. They are made from 100% cotton rag content and have no optical brightener content. (OBA) The base stock is acid and lignin free. The coating is acid free. This type of offers the most archival option in terms of media stability over time.
Museum Grade Summary
100% cotton rag content
Acid and lignin free base stock
Inkjet coating layer acid free
No OBA content
Photographic Grade Paper
Photo Grade products are designed to look and feel like modern photo lab paper. Most photo grade media are resin coated, which means they have a paper core covered by a thin layer of polyethelene (plastic) . Plastic gives the paper its photo feel, stability (flatness), water resistance, handling resistance, and excellent feed consistency.
Prints on photo grade media are stable over long periods. With pigment inks in a protected environment, you can see up to 80 years on-display life. All RC papers are Photo Grade for two reasons. Plastic content is not technically archival by museum standards. Also, the inkjet coating of all RC papers is slightly acidic. It facilitates instant drying and does not actually change the stability of your inks over time. Virtually all RC papers have optical brightening agents (OBAs).