Introduction
The Epson R2000 was released in May of 2011. Red River Paper had one immediately dispatched to our Dallas headquarters for evaluation and profile production.
The R2000 is the successor to the Epson R1900. In many respects the printers are quite similar. For the new printer, Epson has added some new features and most notably larger 17mL capacity ink tanks. Below is a walk through of our opening, unpacking, and setup of the Epson R2000.
Just the Facts
13" Wide photo quality inkjet printerp>
Can print 3.5" x 5" up to 13" x 129" banners
Six Colors - Cyan, Yellow, Magenta, Red, Orange, Black
Gloss Optimizer - Clear spray coat for glossy, satin, and semigloss prints
Cost $499
Ink Cost - About $19.99 per tank (17ml capacity)
Rating - We recommend the printer as a "Likely Buy" for photo enthusiasts
Opening the Box


The R2000 box arrived on our dock this week. Since the printer comes a long way, it is more than adequately packed and secured. There are about 25 pieces of blue tape holding everything snug and plastic wrap to protect the shiny outer surface. The printer comes in a heavy duty plastic bag with handles, which makes getting it out of the box a breeze.
The Epson R2000 shipping box includes:
- Epson R2000 printer
- Roll holders
- CD tray (for printing CDs)
- Inks
- Manual
- Power cord
- Driver CD
R2000 Inks


The printer comes with a full set of CLI-42 ink cartridges. A small amount of ink will be used in the printer setup, but you will still have plenty left to make prints and become familiar with the machine.
The printer comes with a full set of Epson UltraChrome Hi-Gloss 2 pigment based inks. Pigment inks are purpose designed to resist fade over long periods of time. For this reason, prints from the R2000 will last between 40 and 100+ years depending on the paper type you use and how the images are displayed.
The new 17 ml ink tanks are the same width as other cartridges, but they are quite a bit taller.
Epson R2000 Ink Tanks Included
- Photo Black UltraChrome Hi-Gloss 2 ink cartridge (T159120)
- Matte Black UltraChrome Hi-Gloss 2 ink cartridge (T159820)
- Cyan UltraChrome Hi-Gloss 2 ink cartridge (T159220)
- Magenta UltraChrome Hi-Gloss 2 ink cartridge (T159320)
- Yellow UltraChrome Hi-Gloss 2 ink cartridge (T159420)
- Red UltraChrome Hi-Gloss 2 ink cartridge (T159720)
- Orange UltraChrome Hi-Gloss 2 ink cartridge (T159920)
- Gloss Optimizer UltraChrome Hi-Gloss 2 cartridges (T159020)
Photo Black Ink vs. Matte Black Ink

The Epson R2000 has both Photo Black and Matte Black inks on board. Photo Black is ink optimized for printing on glossy, luster, satin, and semigloss papers. Matte Black is for use with any matte (non-reflective) and most cotton fine art media. Which ink is used depends on the media selection in your printer properties. The R2000 does not use both of these inks at the same time.
Like the R2000's relatives the R800, R1800, and R1900, the printer keeps both photo black and matte black inks "at the ready". This means the print head is always charged with both inks, and all you need do is choose the correct media setting for your printer. There is no swap process necessary that uses ink and time. This is in contrast to the Epson R2880, R3000, and other Epson wide format printers that require a cartridge swap or purging process when switching between black inks.
Gloss Optimizer

One of the R2000 ink tanks contains what Epson calls the Gloss Optimzer. This system, first introduced in the Epson R800, is a clear coat that is sprayed on prints during the print process. It is available when printing with glossy, satin, and semigloss media.
Gloss Optimizer (aka GLOP or GO) is thought to be the base liquid material used to make inks. When applied, the Gloss Optimzer does some nice things:
- Adds a subtle, but not really distracting, extra level of shine to prints
- Adds increased scuff resistance
- Increases the dMax and overall color saturation of an image
The Gloss Optimizer makes a noticable difference when sprayed on photo paper. In this unmodified photo you can see exactly where the Gloss Optimizer has been sprayed by the printer. Printed on Red River UltraPro Gloss, the area at left is a block of Gloss Optimizer and the area on on the right is plain unprinted paper.
Getting Ready to Print

Once all of the inks were installed, the printer charged the print head and was ready to begin printing in less than five minutes.
The assembled printer is 24.5" wide, 13" deep, and 8" high
With the top tray open and extended, you'll need at least 10" of clearance from the printer to the wall for proper operation.
When fully extended, the front paper tray extends 13.5" from the front of the printer. That is enough space to catch and hold a full 13x19 sheet.
Front Control Panel

The front control panel of the Epson R2000 features six buttons and various warning lights. The buttons control activation of Wi-Fi and Ethernet connectivity, paper feed, job cancellation, ink change, and roll printing.
Connectivity

The Epson R2000 can connect to your computer via USB 2.0, Ethernet (network cable), or a wireless network.
Media Paths


The R2000 has four media feed paths.
- Top tray - for the majority of media you'll use
- Front single sheet path
- Rear single sheet thick media path
- Roll feed


The top tray can hold 1 to 100 sheets of paper, depending on the thickness of your media. We use this paper path for the bulk of our printing needs.
The front single sheet path is designated for fine art papers and poster board. Basically, Epson is suggesting that you use this paper path for media over 15 mil thick.
The rear single sheet path is another way to feed thick papers and cotton fine art media such as Red River's Aurora Art.
Roll feed

The printer also comes with two roll holders. They attach to the back of the machine as shown at right. When paper is fed into this slot, the printer recognizes it as a roll and begins the feed process.
While Red River Paper does not carry 13" rolls at this time, you can try our 13" x 38" flat sheets for pano and landscape printing.
CD Printing Capability

Above you can see the CD holder that comes with the printer. The holder is placed into the front feed tray and when inserted alerts the printer to prepare for CD printing.
When printing CDs you'll use Epson's Print CD software. The program is very easy to use and can be mastered in less than an hour.
Printer Driver Tour

Like all Epson printers, the R2000 has easy to understand and operate printer driver software. Below we review most of the relevant functions that you will use regularly.
Media Type

When setting up a print job, you must tell the printer the type of inkjet paper (media) that you are using. Think of the media type as part color profile and part ink throttle. Different inkjet papers need different amounts of ink to perform properly - and this is where the media setting becomes important.
If you are using ICC color profiles, the media type is critical. You have to set the media according to your profile's instructions in order to get the best results.
Quality Options
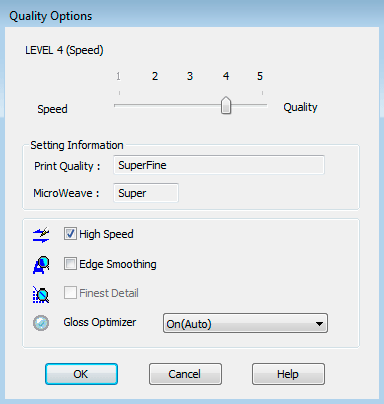
To get to this menu, go to the Print Quality drop down and choose Quality Options. We recommend using this menu so you can verify the print quality setting. You will also have access to the High Speed option.
High Speed means that the printer puts down ink each time it passes over the paper. Turn off high speed if you notice fine banding.
Quality Choices
When printing with photo papers, quality choices are Fine (Level 2) , SuperFine (Level 3), SuperFine with Microweave set to Super (Level 4), and SuperPhoto (Level 5).
Gloss Optimizer Controls

Gloss Optimizer is available when printing on glossy, satin, luster, and semi-gloss media. The spray can be turned off, set to print on only the image area, or set to cover the entire sheet of paper.
Mode

This drop down controls printer color management. The first four (EpsonStandard, Adobe RGB, Epson Vivid, and PhotoEnhance) are Epson color management options.
HINT: If you letting the printer control color management, we found that the Adobe RGB setting provides the most life like and accurate color reproductions on all media types.
When using an ICC profile, you'll select Off (No Color Adjustment).
Paper Sizes

Fairly self explanatory, this is the menu where you tell the R2000 what paper size you're using. Right below the size drop down is the borderless printing box. You will check this when you want the R2000 to print ink to the very edges of your paper. Below are the popular borderless sizes the R2000 can print:
- 3.5 x 5
- 4 x 6
- 5 x 7
- 5 x 8
- 4 x 7.11
- 8 x 10
- 10 x 12
- 11 x 14
- 12 x 12
- 13 x 19
- 8.5 x 11
- 11 x 17
User Defined Paper Sizes


Like other Epson printers, the R2000 allows you to define custom paper sizes. The limits:
Paper Width: 3.5" - 12.95"
Paper Height: 3.5" - 129"
Custom Borderless Now An Option
The R2000 differs greatly from other printers because it can print some custom sizes with no borders.
By clicking "Enable Borderless printing" on this menu, the controls will change slightly. As you can see at lower right, the paper width becomes a drop down menu with 10 fixed sizes. You'll select one.
The paper height is still a range from 3.5" to 129".
Drop down menu with available borderless widths
Page Layout

The page layout tab is like most other Epson printers. Print orientation, number of copies, layout options, and a host of other features we'll probably never use!
Job Layout

One interesting new option is the Job Settings feature. By checking the Job Settings box then clicking the Details button, you will be presented with the menu at right.

Your print will then contain all of the information you've selected. As you can see below, this print was made on a 5x7 sheet of paper with a 4x6 image. The detail information fits nicely at the top.

For those who like to record settings for future use, or just like to know what settings work, the Job Settings feature should be a welcome addition.
Utility Tab

You should come to this tab often to perform routine printer checks and maintenance. The Nozzle Check, Head Cleaning, and Print Head Alignment are all critical tools to have it you experience a drop in print quality.
You can quickly bring up the print queue in case you need to check on a job. And Epson allows you to move printer driver controls around using the Menu Arrangement feature.
A nice addition is the Driver Update button, which performs a quick check with Epson to see if you have the latest software. An internet connection is required for this feature.
Print Speeds and Results
Print Quality
As mentioned above, print quality choices are Fine (Level 2) , SuperFine (Level 3), SuperFine with Microweave set to Super (Level 4), and SuperPhoto (Level 5).
For most Epson printers, a photographer would likely choose Level 4 High Speed OFF for most images. If you are printing quick proofs and are looking for best ink economy then Level 3 is a good choice.
Below are some close up images of the prints made on Red River's Polar Gloss Metallic 255 (formerly 66lb. Polar Pearl Metallic) at each quality level. You can easily see the difference in how the R2000 lays down ink dots to create different levels of quality.
NOTE: We like to stress that viewing images this close up is only illustrate dot placement and tigntness of image quality. What really matters is how you perceive image quality at standard viewing distance, which is usually a little less than arms length for snapshots up to about 8x10.


Over our years of experience, the recommended print quality setting when using an Epson printer is usually Level 4 (or 1440 x 1440dpi). Higher settings seem to use much more ink and take about twice as long to print with little observable change in quality.
Print Speed

An 8" x 10" file at 240ppi (shown at right) was printed at each of the above settings.
Level 3 = 2 minutes 7 seconds Level 4 = 2 minutes 36 seconds Level 5 = 4 minutes 21 seconds
Black & White
Unlike other higher end Epson printers, the R2000 does not have a black & white specific ink system (ex. Epson R3000's Advanced Black & White system). So when printing B&W, the printer will likely use a mix of all colors to create grays and blacks.
We printed a number of RGB images that were converted to B&W and images in Grayscale mode. The results were good on various paper types. While the prints were not perfectly neutral they were pretty close. All of the prints exhibited some color shift when viewing under different light sources (sometimes called metamerism). Each of the prints was closest to neutral B&W when viewed in sunlight (5500K).
Red River Paper Compatibility


Our line of premium inkjet papers includes over 20 that work very well with the R2000. You can See the Most Popular Papers for the Epson R2000 and Order a Sample Kit as well.
Print Testing
We made a number of prints on virtually all compatible Red River papers from 4x6 up to 13x19 borderless. Some have in fact already been framed and hung!
Glossy Papers
With the Gloss Optimizer turned on, prints on Red River UltraPro Gloss had great saturation and detail quality. The Optimizer removes any hint of bronzing or gloss differential, which are two issues related to pigment ink usage on glossy and satin surfaces.
Satin / Luster Papers
The satin surface is by far the most popular photo inkjet paper surface on the market. This is because for years and years photo prints were made on this slightly textured media. Pretty much anyone who holds a satin paper print will ackowledge they are holding a "photograph". Red River's super popular UltraPro Satin and true professional grade Arctic Polar Luster create astonishing quality with the Epson R2000.
Photo Metallic Paper
This is the big one! Polar Gloss Metallic 255 is the hottest paper Red River offers. It offers you the ability to print the look of Kodak Endura Metallic on your home inkjet printer. Images virtually jump off the page and colors are vibrant and almost luminous. Walk in customers here at Red River were at a loss for words when we showed them Polar Pearl prints on the Epson R2000.
Photo Matte
Matte papers are smooth and have no reflection. They are perfect for images and work where fine detail is important. A flat surface means more light gets directly back to your eyes. This means you see more detail and are not distracted by glare. Red River Polar Matte
Fine Art
The Epson R2000 performed well with our Aurora Art Natural and White. With fine art media, deep blacks are important as well as cross-over or mid-tones in an image. Aurora performed very well when printed at Level 4 using the Ultra Premium Presentation Paper Matte setting.
First Impressions
After spending about a week with this printer, the Epson R2000 seems like a worthy replacement for the R1900. The Epson UltraChrome Hi-Gloss 2 ink system provides amazing results, especially on satin, glossy, and luster papers. As with older Hi-Gloss ink printers, the fact you can seamlessly switch between photo black and matte black media is a great benefit.
Positives
Initial cudos go to:
- Instant blank ink swap
- Bold and true to life color saturation
- Larger ink tanks
- Custom borderless options
- Professional print driver
- Multiple media feed options
Questions
There are a couple of features in the R2000 printer properties that caught our eye, but that did not have an explanation in the written or online documentation.
What is the Layout manager?

This box is on the Main tab of the printer properties. When checked, all of the main media, quality, and color management controls grey out.
Auto Ink Density Optimization

This looks like a cool feature, but we'd love to know what specifically it does and how often we should use it.
Papers for the Epson R2000
You can Shop for our Most Popular Papers on One Page.
Shop Sample Kits for the R2000
Related Posts and Information
Last updated: November 14, 2024


