How to Make Posters (Even Big Ones) from Photos and Artwork
By ARTHUR H. BLEICH
You can print large, beautiful posters of images or artwork up to any almost any size using the printer you already own.
Here's how it works. Just determine the size you want your poster to be and software will do the math, dividing it he image into sections you can then print out and join together. The process is called tiling and it's like doing a jigsaw puzzle without having to figure out where all the pieces go because you can also opt to have the position of each tile printed out to make assembly easier.
Easy-to-use Poster Software is Free
You probably already have a copy of Adobe Acrobat Reader installed on your computer to read PDF files, but did you know there's also a poster-making engine hidden within it? And just in case you don't have the app, you can download it from Adobe free. It comes in a Win or Mac version, fully functional with no time limits.
If you've never done a poster before it's a good idea to go for a test drive first. Since this will be your first attempt at poster-making, use plain, uncoated paper to avoid wasting sheets of more-expensive inkjet paper should you run into a problem. You can also conserve colored ink by setting your printer to output in Grayscale.
Preparing Your Poster Image is Simple
Now let's do a poster that will be 22 x 17 inches in Portrait or Landscape orientation that will be enlarged onto four sheets of 8.5 x 11 inch paper. in. Pick a favorite image, size it at that dimension and process it through your favorite imaging program to make it look as good as you can. When you're satisfied with the result, convert it from whatever file type it is (.jpg, .png, etc.) to a .pdf file.
To do this go to File > Save As and then, going down on that page find Format: A drop down menu will allow you to select a file type. Choose .pdf (or Photoshop PDF) and then save your image. Don't worry, your original file will be preserved. NOTE: Some imaging programs may offer conversion through their Export option. There are also free conversion services available on the web to do this in seconds.
Opening Your image in Acrobat Reader
Next open your image in Acrobat Reader by double-clicking on the icon of your .pdf file or by any other method you use. Once opened. go to the little printer icon way up in the right hand corner of the page (to the left of the black “share†button) and click on it. A new window will open (See below). Click on Poster and you're set to go!
SCREEN SHOT # 1 BELOW
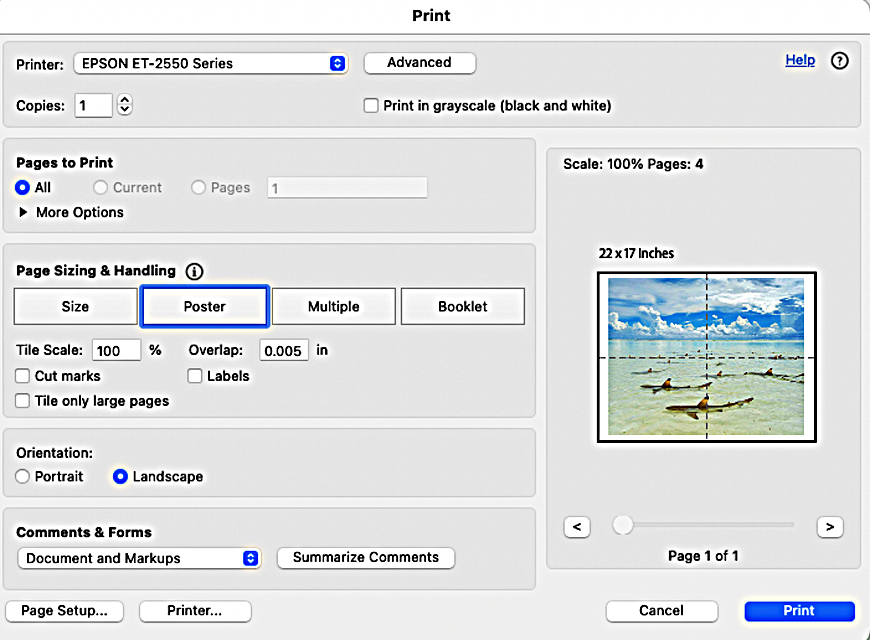
1. First, move down to Orientation and choose Portrait or Landscape, whichever is correct for your image.
2. Next move up to Tile Scale. Adjusting this percentage, makes the poster larger or smaller and changes the number of sheets of paper that will be required to print your image. You will see changes on the image panel.
Note: Do not use Tile Scale for extreme size changes or quality may suffer. Use it primarily for fine tuning. Also,f you change the Tile Scale percentage, the Poster button might become deselected. If so, simply click on it again.
3. Next set the Overlap amount. This number indicates how much each piece of paper will overlap the other after they're printed so that you can to tape or glue them together for a continuous image. The default is usually sufficient but you may find that a slightly larger overlap is easier for you work with.
Other Poster Printing Options to Consider
Although the other poster options can be left unchecked on your first poster, you may find them very useful –and in some cases necessary– if you begin to do bigger posters with many tiles.
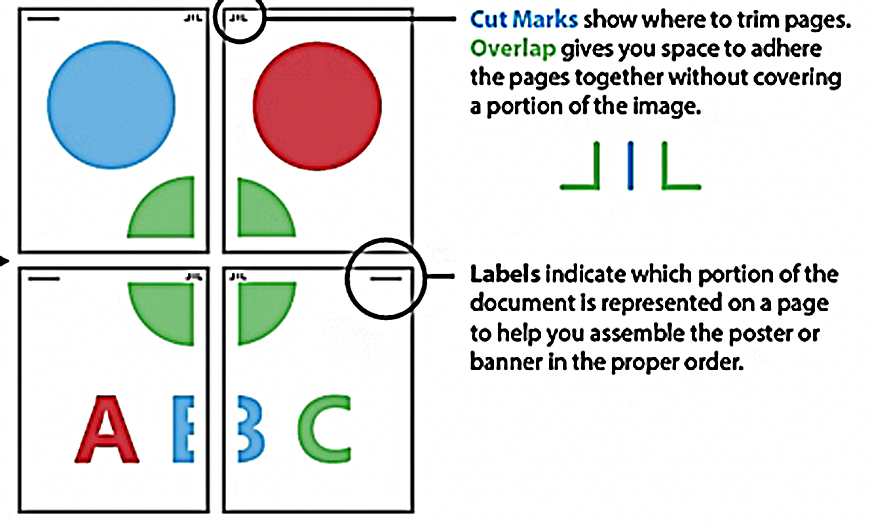
- Cut marks add guide marks to each page to help you trim the overlaps correctly. While you can line up overlapped edges by eye, having a cut mark on each end makes trimming them easier.
- Labels add the filename and page number to each tile in order to keep track of the sequence of images when dealing with many tiles. It is also useful when trying to line up adjacent tiles that do not contain details to make matching easy, such as blank sky or water areas.
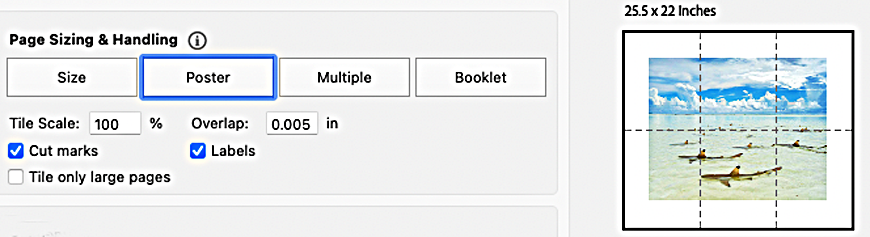
- Troubleshooting tips. Cut marks and Labels may sometimes not be able to appear because there's no space for them when the image sections of the poster extend to the edge of the printer's printable area. The mage preview will indicate the new number of pages required in order for them to appear. To keep your original number of pages, try reducing the Tile Scale percentage by a small amount.
- After each scale adjustment, click on the image to see if there has been a change.
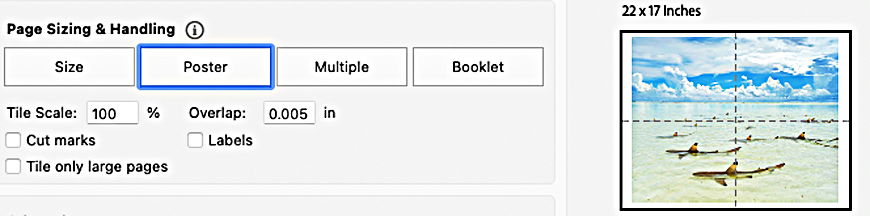
- .In he first screenshot below, Marks and Labels are unchecked. In the second screenshot they have been checked and, for them to appear on the final print-out it is necessary for the software to re-configure the number of sheets of paper required.
- NOTE: Tile only Large Pages is not used for posters.
SCREEN SHOT # 2 BELOW
Before You Click “PRINTâ€
This next step is important. SEE SCREENSHOT # 1. It will allow you to set your paper type and print quality. Otherwise, if you just click the print button at the right hand bottom of the page those choices will not be available to you.
At the lower left of the page, you'll see two options: “Page Setup†and “Printer.†Click on: PRINTER. A pop up notice asks your permission to have the printing function handled by your printer driver. Click: YES.
You now have access to your usual printer options. In the middle of the page look for Layout. Click on Layout and a menu will drop down. Select: Print Settings and you'll then be able to select paper type and print quality.
NOTE: Different printers may display these options on different parts of the page.
After making your paper and quality selections, Click: Print at the lower right hand corner of the current page you are on and the four pages of your poster will be output. NOTE: Do NOT go back to the previous page to print from.
How to Assemble Your Poster
You will now have four, separate pages that make up your poster.
Here are some assembly options:
1. Trim the white margins from the images and then overlap the remaining edges and tape them together.
2. Mount the tiles on a sheet of matte board (obtained at office supply or art stores) with re-positionable glue (if you make a mistake you can lift a tile off and realign it again. You will still need to overlap edges.
3. You can also butt the sheets edge- to-edge against each other. If you want to try this, make sure the Overlap box is cleared before you begin printing. Paper can then be taped together or assembled on a matte board backing.
You'll need a scissors or paper cutter and, depending on the assembly method you choose, either invisible tape (which is also removable), a glue stick or re-positionable glue spray. 3M makes all of these types and they are available on the web. Make sure they are Acid Free to avoid contaminating your images. To hold pages in place on a table as you glue or tape them together, use double-sided adhesive dots that are easily removed and won't leave marks.
The best thing about making posters is that it's not rocket science and it's inexpensive. The results can be stunning when viewed in your home or place of business and always draws “ooh-aahs†from viewers. Give it a try. You're sure to enjoy it.
RESOURCES:
Download Adobe Acrobat Reader.
Original Publication Date: June 01, 2025
Article Last updated: July 16, 2025
Related Posts and Information
Categories
About Photographers
Announcements
Back to Basics
Books and Videos
Cards and Calendars
Commentary
Contests
Displaying Images
Editing for Print
Events
Favorite Photo Locations
Featured Software
Free Stuff
Handy Hardware
How-To-Do-It
Imaging
Inks and Papers
Marketing Images
Monitors
Odds and Ends
Photo Gear and Services
Photo History
Photography
Printer Reviews
Printing
Printing Project Ideas
Red River Paper
Red River Paper Pro
RRP Products
Scanners and Scanning
Success on Paper
Techniques
Techniques
Tips and Tricks
Webinars
Words from the Web
Workshops and Exhibits
all
Archives
May, 2026
April, 2026
March, 2026
February, 2026
January, 2026
November, 2025
September, 2025
August, 2025
July, 2025
more archive dates
archive article list


Red River Paper Inc. All contents © 1997 - 2026. 8900 Ambassador Row, Dallas Texas, 75247. Prices, specifications, and images are subject to change without notice. Not responsible for typographical or illustrative errors. Website Terms & Conditions | Acceptable Use
Site Development & Maintenance: Phosphor Media, LLC