NEW EYE-CATCHING WAYS TO DISPLAY YOUR IMAGES!
By ARTHUR H. BLEICH
As the old saying goes, there's more than one way to skin a cat (no offense, cat lovers, I'm one of you). But there's no reason to frame every image under glass constrained by four corners of a rectangle. Thinking outside the frame can yield some eye-catching results.
For instance, going glassless can eliminate distracting reflections from photos and artwork. And eliminating frames entirely can give you great versatility when it comes to adding, removing or substituting images to suit the tenor of the times. You can also save some money by not having to buy expensive frames – though there are some images that deserve that treatment and the expense can be can be well worth it.
I recently I cruised the web and discovered a plethora of different print display options that will make your work shine. I'll share a few of the more interesting ones with you and also tell you how to protect images exposed to air from fading and environmental damage.
QUICK AND EASY: A PHOTO ROPE

One of the simplest ways to display images is to string a line between two points and hang them from it, like laundry drying on a clothesline. This is also an excellent method to use if you ever have to exhibit them. One of our River Pros did just that when he was asked to exhibit his photo collection at a small local library. The system is easily and quickly set up between any two points and the images are secured to the line by small, spring-activated wooden clothespins. its nostalgic touch makes up for its lack of sophistication.
NETAL BINDER CLIPS CAN ADD A TOUCH OF CLASS

For wall hanging, there are equally simple methods, some of them quite attractive looking. One method that caught my eye was the use of ubiquitous metal binder clips. They come in a myriad of different types, sizes and colors and require only a push pin or tiny, adhesive-backed picture hook to affix the hooks to a wall. You can use the clips at the top only, but may want also want to use them at the bottom of the photo for more stability. Depending which style, size or color you choose, they can look quite artsy… and all of them allow pictures to be easily changed or their locations switched.
WOODEN POTO HOLDERS: ELEGANT SIMPLICITY
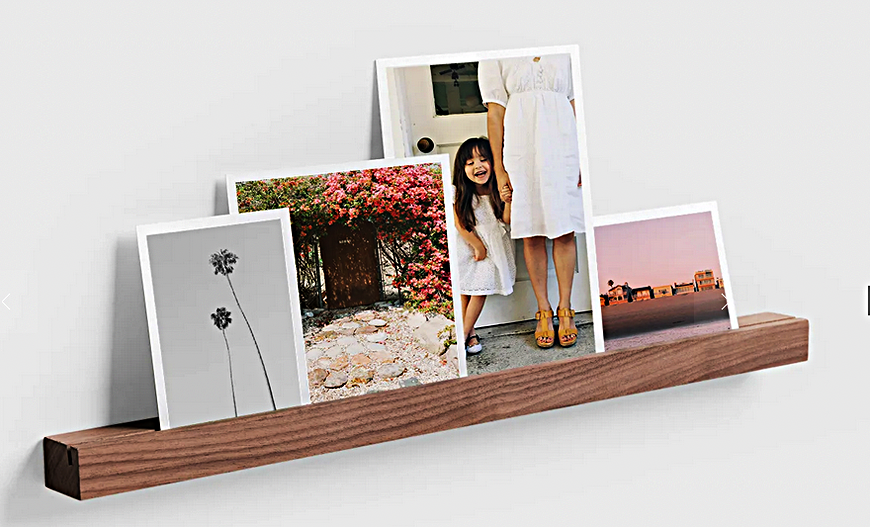
Both the picture ledge and picture stand are made of natural woods and allow you to easily change out images without fuss. The ledge easily mounts to a wall while the block sits alone (or in a grouping), wherever you want it to.
In fact, if you're familiar with basic wood working; you can make your own from scrap lumber using a small table saw. However, these pieces offer so many options in size and finish and are so reasonably priced that I recommend you purchase them.
MACRAME PHOTO HANGERS: BEAUTIFUL TO BEHOLD
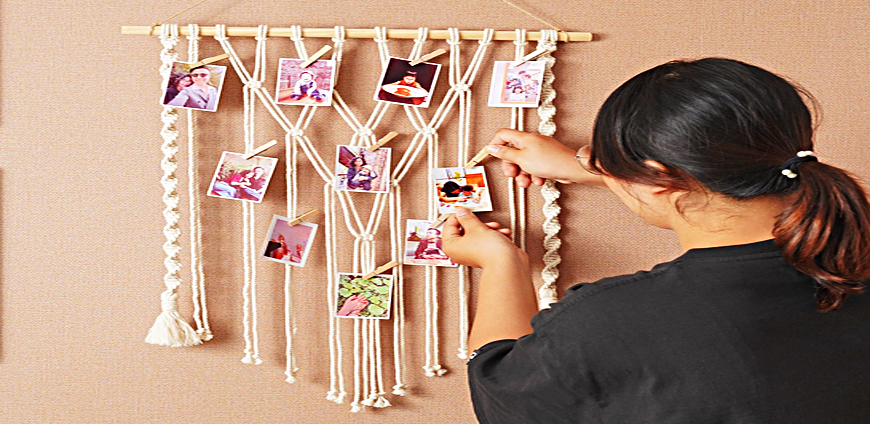
Am unusual variation of wall mounting for smaller images is a hand-woven macrame photo hanger that tastefully displays smaller-sized groups of photos. I's a work of art in itself and comes in different style and color options, complete with mounting clips.
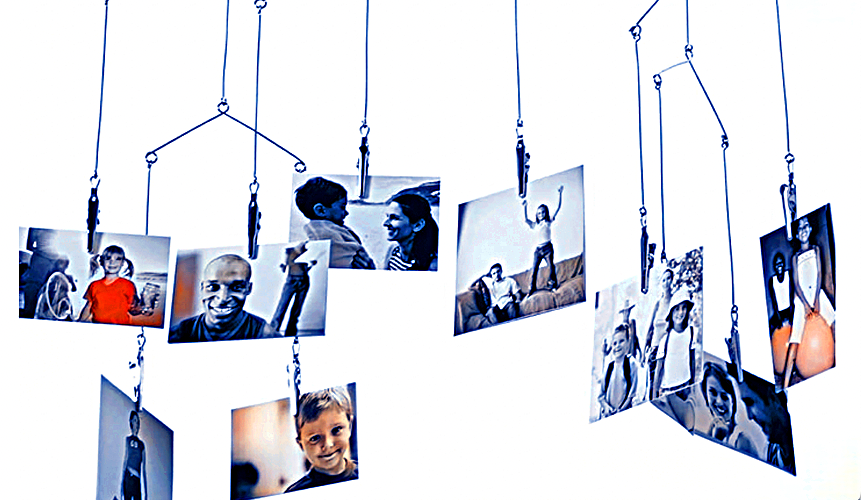
Speaking of unusual, you can also hang smaller prints as a mobile. Simply buy an inexpensive hanging photo mobile frame that includes clips, attach your prints to it and let it swing overhead. There are different styles of mobile frames, some of which would be perfect for a child's room or anywhere else in your home or office.
PHOTO COLLAGE DISPLAYS THAT REALLY STAND OUT
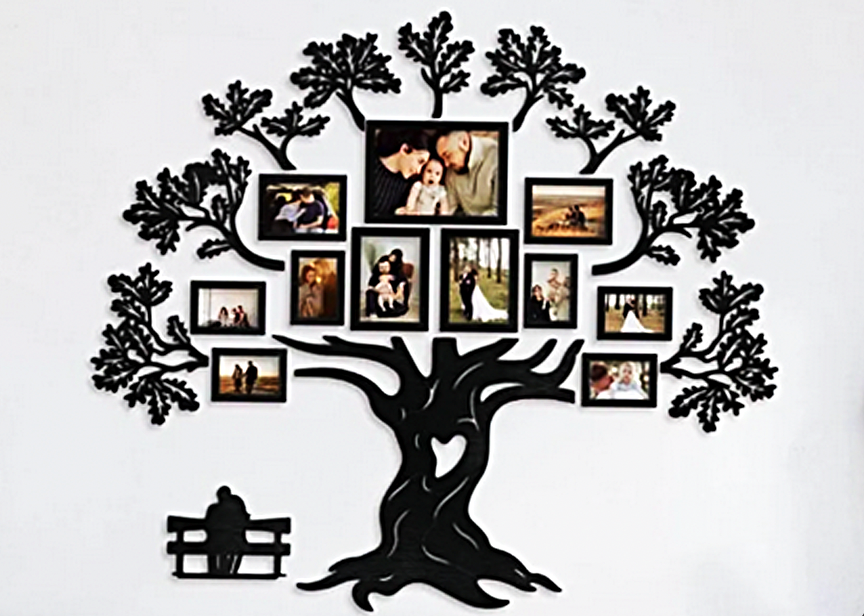
Finally, I was fascinated by some multi-picture, photo collage arrangements that are truly unique. They range from simple to ornate, come with many customizable options and are reasonably priced. They come with plexiglass covers for each image (which you can use or not as desired) and they are easily attached to the wall.
BEST INKJET PAPER FOR UNFRAMED PHOTOS
Images that will be displayed on picture shelves or stands usually hold up better when printed on heavyweight paper; they need some “backbone†to resist sagging or curling. Most of Red River Paper's line of photo papers and card stock will work just fine for moderately sized prints.
Photos that are going to hang can usually take lighter-weight papers, if desired. Large, vertical images displayed on photo shelves or stands may require paper that's more robust to keep them firmly upright. Test the paper you want to use before printing the image to determine its rigidity.
PROTECTING UNFRAMED IMAGES
One of the advantages digital photographers have today is that they can knock out a print in a fraction of the time it used to take in the analog world. So if images get faded by too much exposure to light or environmentally polluted by other means, they can easily and inexpensively be replaced.
Nevertheless, if you want to extend the life of prints exposed to air—and that includes those in frames with no glass to avoid distracting reflections— you can protect them by using a fixative spray.
Fixative sprays are available in various finishes, including glossy, satin, matte, and more that will let you match or even change your image's surface. These sprays will protect your prints from UV light that accelerates fading, as well as other pollutants in the air that are eager to have a go at them.
Here's a quick guide to how to use them. There is more detailed information on the web and at YouTube.
1. Make sure you are in a well-ventilated area.
2. Position the nozzle about 12 inches away from the photo.
3. Apply the fixative in several thin layers to prevent smearing, smudging, fading, and discoloration.
4. When spraying large surfaces in sections, overlap each pass by about 10%.
5. On larger images, do not swivel the can with your wrist as this will give uneven coverage (less at the edges and more at the center).
6. Instead, use your arm to keep the nozzle at the same distance as you sweep across the surface of the print.
7. When finished, turn the can upside down and give it a short squirt to clear fixative from congealing in the nozzle.
8. Let the fixative dry completely before handling the photo.
RESOURCES:
Mobile Hanging Device For Photos
Original Publication Date: November 03, 2025
Article Last updated: November 04, 2025
Related Posts and Information
Categories
About Photographers
Announcements
Back to Basics
Books and Videos
Cards and Calendars
Commentary
Contests
Displaying Images
Editing for Print
Events
Favorite Photo Locations
Featured Software
Free Stuff
Handy Hardware
How-To-Do-It
Imaging
Inks and Papers
Marketing Images
Monitors
Odds and Ends
Photo Gear and Services
Photo History
Photography
Printer Reviews
Printing
Printing Project Ideas
Red River Paper
Red River Paper Pro
RRP Products
Scanners and Scanning
Success on Paper
Techniques
Techniques
Tips and Tricks
Webinars
Words from the Web
Workshops and Exhibits
all
Archives
June, 2026
May, 2026
April, 2026
March, 2026
February, 2026
January, 2026
November, 2025
September, 2025
August, 2025
more archive dates
archive article list


Red River Paper Inc. All contents © 1997 - 2026. 8900 Ambassador Row, Dallas Texas, 75247. Prices, specifications, and images are subject to change without notice. Not responsible for typographical or illustrative errors. Website Terms & Conditions | Acceptable Use
Site Development & Maintenance: Phosphor Media, LLC