Upscale Your Images With A Free AI App!
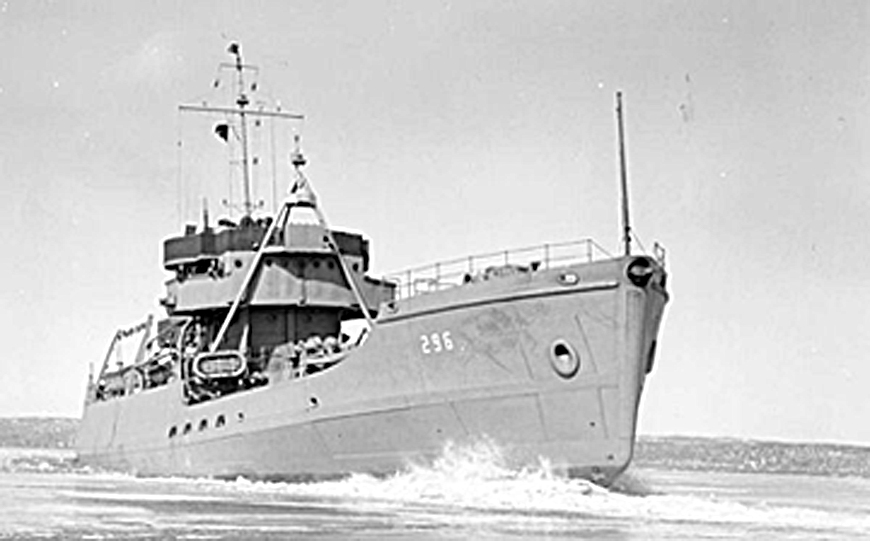
This originally-sized 3x5 inch photo was enlarged to 7.5 x 12 inches using conventional Photoshop resampling but its quality is degraded due to the lack of an adequate number of pixels in the image.
by ARTHUR H. BLEICH
Ever wish you could enlarge an image (or blow up a small part of one) without it turning into mush? You're not alone. Millions of photographers suffer from a malady called “Low Resolution Blues.†Cheer up! Artificial Intelligence (AI) Upscaling is the cure and it's going to change photography forever.
It's called AI Upscaling and whether it's used to enlarge small snapshots (after they've been scanned) or for blowing up low-resolution digital images or parts thereof, you won't believe the sharp, beautiful images that will roll out of your printer. AI upscalers are also learning more tricks –like filling in missing parts of images, sharpening, removing artifacts and more– and they're doing it better than options currently used in imaging programs.
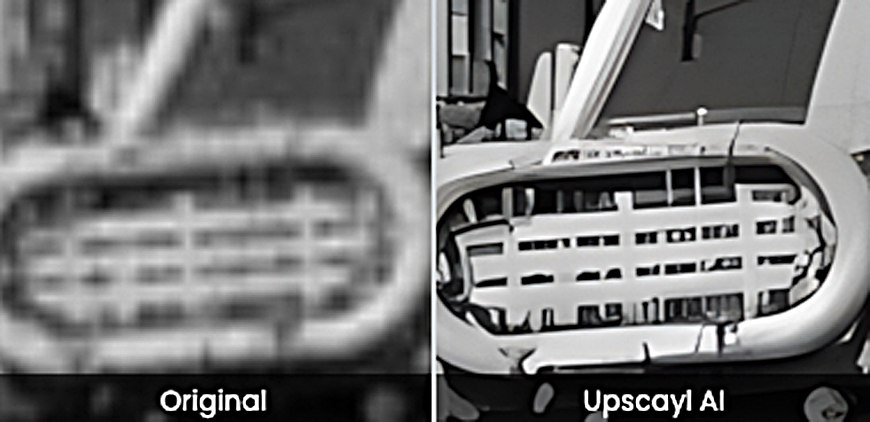
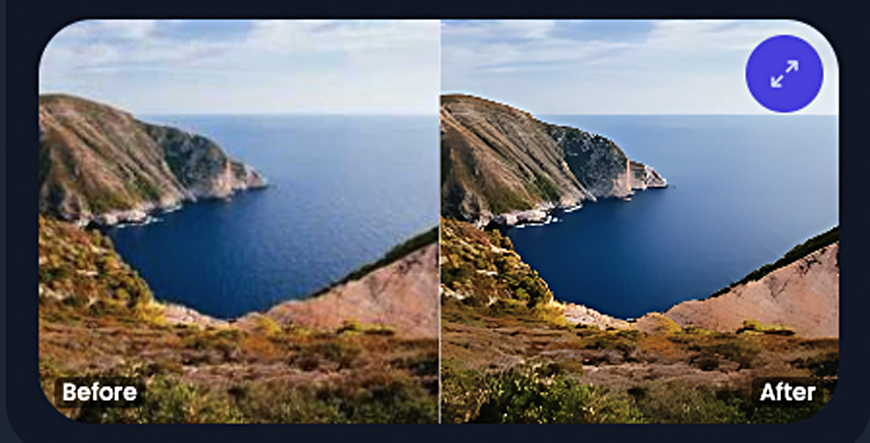
You can inspect your upscaling results with either a split-screen view or a magnifer view (as shown above). Choose your preferences in the Righthand Menu (click on ... to get there).
There are more than a dozen commercial upscaling programs now vying for your attention, most starting at about $100 or more. Some are downloadable, others are web-based, while still others are being integrated into imaging programs. But if you want to get acquainted with AI upscaling , there's a simple app you can try called Upscayle 2.51 (see Resources, below). It works with Widows, Mac or Linux, is easy to use.
AI TACKLES UPSCALING IN A WHOLE NEW WAY
Before we get into it, though, let's briefly review resolution, image size and how AI fits into the picture. Digital images are made up of square pixels. When your image is enlarged, the pixels become noticeable and begin to degrade the image. So the maximum size your image (or part of it) can be blown up and still look good is limited by the total number of pixels it contains. Images with lots of pixels are said to have high resolution and those with fewer, low resolution.
If you have images taken with early, low-resolution digital cameras or just want to enlarge cropped sections of others, you might not have enough pixels (resolution) to blow them up to the size you'd like before they begin to become visible to the eye and degrade the photo. If you're familiar with film, it's like grain beginning to show when a photo's been enlarged too much. And though you cannot eliminate that problem with film, imaging programs can add more pixels to images if there are not enough to produce a good image.
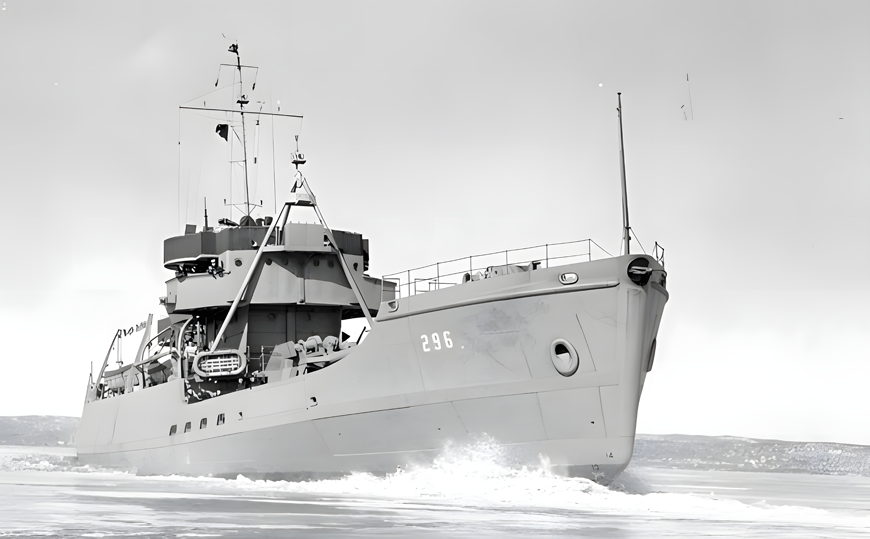
The same image as above, enlarged with Upscayl AI, shows a dramatic improvement in quality. AI technology not only improved the look of the ship, but has cleaned up other areas of the image including sky and water.
The process, called Resampling, works pretty well when you make modest enlargements, but falls short as they grow in size. AI tackles this in a whole new way. It has “gone to school,†so to speak, and has memorized what hundreds of thousands of excellent high resolution images in different subject categories should look like. It then compares what it's learned to to how your image looks and fixes it.
It analyzes the patterns, textures, and edges in your image and, based on its training, intelligently predicts the number (and colors) of pixels needed to increase the image's size while maintaining image clarity and details. The process can also remove unwanted artifacts, fill in missing or degraded details, contribute to sharpness without producing halos around edges and generally help to restore and/or enhance the image. And it ‘s a huge improvement over Resampling.
RED RIVER PAPER'S QUICK-START GUIDE TO UPSCAYL AI
Now let's get acquainted with UPSCAYL AI and test drive what AI has in store for the future of photography— technology you can use now to make your images shine.
At the Upscayl site, (see Resources below for link) scroll down and click on the Windows or Linux large icon to download the software. MAC users: Do NOT click on the the large MAC icon. Use the Alternate Downloads dropdown menu to select MAC OS. using the large Mac icon leads to the App Store which requires a fee.
Install the program it as you would any new software, open it, and the main menu will appear on the left hand side of the screen. Follow instructions on the main screen to bring your image into the program, NOTE: When your image appears, it may sometimes obscure the main menu. Left and right hand menus can be accessed by clicking (<) on the left hand border of an image or (…) on the right hand border of the image.
GETTING STARTED: THE SETTINGS MENU
At the top of the Main Menu click on Settings. Only a few items need setting. Upscayl Theme (I like Light). Upscayl Language (Choose one). Save Image As ( PNG, JPG, WEBP). Save Output Folder should be ON and images will default to that folder. Overwrite Previous Upscale should be ON. These will get you started and as you use the program you may want to experiment with some others. You do not need to adjust Image Scale here as you can access it from the main menu. Now scroll to the top and click the Upscayl button (next to Settings) to return to the main menu.
Upscayl's well-thought-out user interface will have you up and running quickly, with stunning results.
JUST FOLLOW 4 EASY STEPS
Next, follow the steps in the menu. Starting from the top, make sure Batch Upscale is OFF and go to:
Step 1. Select Image. You can input png, jpg, jpeg or webp images. The easiest way to is to drag their icons into the window, but other options are given. NOTE: Always make back-up copies of your images.
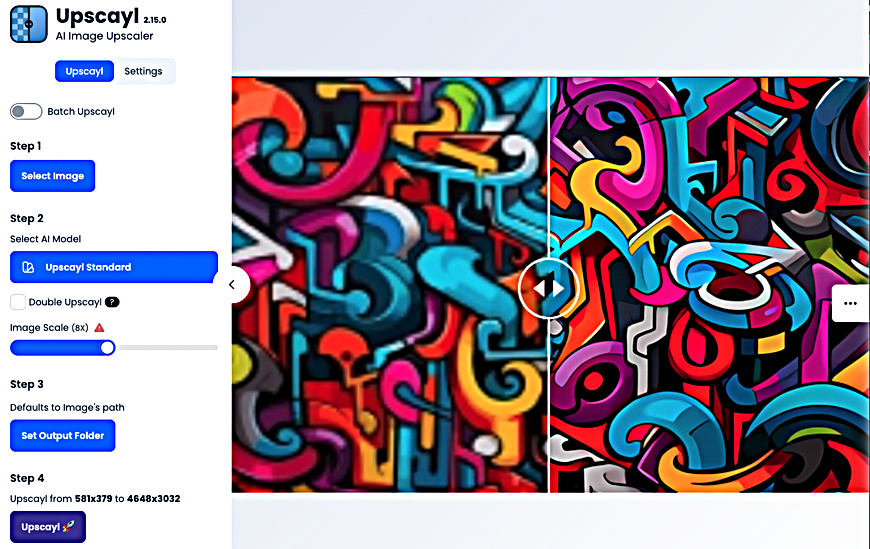
Step 2. Select AI Model This is where you'll choose from one of seven AI models to process your image. The model selections temporarily replace your image window. You'll be able to see the effect they have on different kinds of images. Begin by selecting Standard.
Next, make sure Double Upscale is NOT checked. Then move to the Image Scale slider to choose the amount of Upscaling desired. As you move the slider you can see, at the bottom right of the menu, a readout of what your original image size is and what its resolution is being upscaled to.
The default for maximum upscaling is 4x but you can specify less. Anything more than 4x is not AI supported and reverts to standard upsampling. But an image can be upscaled more than once, though it will take longer to process. So if you're not satisfied with your first result, that's the time to either try a different model and/or check Double Upscale and run your image through again.
Step 3 gives you the option to select where the image will be stored on your computer. If no selection is made it will default to the folder from which it came, with “Upscayl†and the image model added to its name.
Step 4 is the moment of truth. Click on it and Upscayl will get to work.
When Upscayl finishes processing your image, you can examine it by moving your cursor over it. Depending on which method you have set in the Righthand menu you can view it split -creen or with a magnifier and then make further changes by using the Double Upscale feature or other models..
his is one of 7 models you can try to see which works best with your image. Despite its simplicity the software is extremely powerful. A slider can be moved from side to side over each model to check details.
TRY DIFFERENT MODELS ON THE SAME IMAGE
If you don't like your results or just want to try some different model variations, you can do so using the same image. Upscayl doesn't automatically save the upscaled image and treat it as a new original; instead, it keeps track of the original image and allows you to apply different models to it sequentially. To try a new model, leave the current image in place and repeat Steps 2-4.
In the Right Hand Menu you may also select either Lens View to let you magnify your upscaled image or Slider View which lets you to view it in a before-and- after movable split screen mode. You can also adjust the Zoom Amount slider which makes it easy to examine fine detail.
ABOUT THE IMAGE RESET BUTTON
The function of the Reset Image button in the right-hand menu is to undo the current model applied to your image so you can try a different one without having to reload the image again. On the fast Mac I used to test-drive Upscayl, it didn't work. Instead, it saved the image requiring a new one if I wanted to see how additional models looked.
Now it may function perfectly on your computer, but some users have reported this. After trying several “fixes†that didn't work, I realized that to compare the effects of different models on your image it's best to view them side-by-side, not one after the other where each model needs to be processed anew before you can view it and you cannot flip back and forth while comparing them because they overwrite each other.
So I began to make several copies of my original images. I'd bring one of them into Upscayl, apply the Standard model and save the image (in my case to my desktop). Then, if I wanted to compare it with another model, I'd repeat the process again using another copy and would end up with several models to compare side-by-side in detail without being rushed or having to rely on my memory as to how they had looked. Since Upscayl adds the name of the model to the image name it's easy to tell them apart.
Upscayl has an intuitive user interface than makes it easy to use and us bound to become an indispensable AI tool that will yield results only dreamed of by photographers up till now.
NOTE: As of this publication date, Upscayle is compatible with Windows 10 and above and Mac 12 and above. It will be available for Mac 11 in a future version. Also, A web-based version that will reduce processing time is also currently being Beta tested.
RESOURCES:
Download Upscayl AI HERE or https://upscayl.org/download
For Detailed information about any aspect of Upscayl or its settings, ask Google
Original Publication Date: July 02, 2025
Article Last updated: September 26, 2025
Related Posts and Information
Categories
About Photographers
Announcements
Back to Basics
Books and Videos
Cards and Calendars
Commentary
Contests
Displaying Images
Editing for Print
Events
Favorite Photo Locations
Featured Software
Free Stuff
Handy Hardware
How-To-Do-It
Imaging
Inks and Papers
Marketing Images
Monitors
Odds and Ends
Photo Gear and Services
Photo History
Photography
Printer Reviews
Printing
Printing Project Ideas
Red River Paper
Red River Paper Pro
RRP Products
Scanners and Scanning
Success on Paper
Techniques
Techniques
Tips and Tricks
Webinars
Words from the Web
Workshops and Exhibits
all
Archives
June, 2026
May, 2026
April, 2026
March, 2026
February, 2026
January, 2026
November, 2025
September, 2025
August, 2025
more archive dates
archive article list


Red River Paper Inc. All contents © 1997 - 2026. 8900 Ambassador Row, Dallas Texas, 75247. Prices, specifications, and images are subject to change without notice. Not responsible for typographical or illustrative errors. Website Terms & Conditions | Acceptable Use
Site Development & Maintenance: Phosphor Media, LLC