How to Shoot, Stitch, and Print Stunning Panoramic Photos
By ARTHUR H. BLEICH
You can shoot stunning panoramic images with a digital camera or smartphone, stitch them together with free software which you probably have as a feature on your imaging program and then output them– even on a humble, letter-sized desktop printer. And it can all be done in just an hour or so.
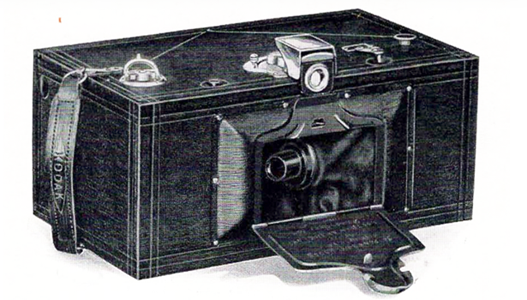
Panorama photos pack a punch, showing vistas much as the human eye sees them. From the mid-1800’s professional photographers were shooting panos all over the world with highly sophisticated (and expensive) cameras that required photographic glass plates. In fact, during the American Civil War, these super-wide photographic images helped plan military strategy for both the Union and Confederate armies. But it wasn’t until 1900 that Kodak’s Panoram 1 camera using flexible film and a swinging lens hit the consumer market enabling amateur shutterbugs to experience the excitement of the genre.
If you’ve never shot a panorama– maybe because you thought it was too complicated– rest assured. It’s become so easy to do that you can shoot your first pano images in just a few minutes, then have them combined automatically, and end up, printing your finished composite in less than an hour. So let’s begin with the basics.
PANORAMA IMAGE BASICS
1. Hold the camera vertically when shooting. This will give your final stitched image some height so that it doesn’t look too long and skinny.
2. Limit the number of images you take. Four to six images will give you perfect results.
3. Make sure the camera as level as possible when you shoot your images, whether you’re hand-holding the camera or if it’s on a tripod.
4. Frame each new image to include 30 to 50 percent of the previous one. This makes it easier for the pano software to have reference points to allow it to stitch your photos together seamlessly.
5. If you flub one of your mages when shooting, no problem. Just shoot it again and exclude the bad one from the mix before giving the stitching app the go-ahead.
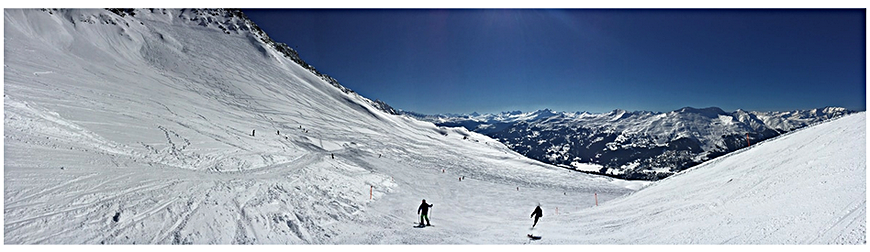
6. Static scenes are best to begin with. If there’s motion in them (people or vehicles) you may get some unwanted blurred or double images when they are stitched together. But it can work if moving objects are far enough apart. (see ski pano above).
USING SOFTWARE APPS FOR STITCHING
Many imaging programs now include a pano stitching function. Photoshop, Lightroom Classic, Photoshop Elements and some others do a creditable job so if you have access to one of these, try them first.
However, if you want to go further, then Hugin (pronounced You-gin) is FREE software you may want to consider. Although its forté is complex stitching challenges (such as pano sequences shot from drones), it also has a simple mode to allow automatic, three-step stitching. You just load your images, and Hugin aligns them and creates a perfect panorama – no need for you to fiddle around with control points or other technicalities. (see RESOURCES below).
ASSEMBLING YOUR iPHONE PANO IMAGES
iPhones have a built-in pano image maker and there’s also an inexpensive app, Bimostitch, for Android phones (see RESOURCES below).. iPhones also have a built-in guide to aid you while you’re taking images to assure the best possible results. As you pan to acquire your images, there’s a horizontal line displayed with a moving arrow overlaid to help you keep your camera level.
After you acquire your shots the phone stitches them together and shows you a finished panorama. Don’t like it? Just do it again until it meets your expectations. When satisfied, resample your image to the size that will fit best on the paper size you'll be using.
PRINTING YOUR FINISHED PANO
Red River has several long-length papers in popular surfaces that are perfect for printing panorama images (See Resources below). And what’s a little-known fact is that most printers (even small, letter-sized models) can output prints that are longer in length than standard sizes.. Check your printer’s specs to see the length of inkjet paper it can print.
If you have a desktop printer, an excellent blog post to read is How To Get Bigger Prints From A Small Printer which was posted on March 28, 2025. (see RESOURCES below.)
Printing your p[panorama is really the easiest step in the process. And once it’s done, framed and hung, the impact will be awesome. So go to it and have something unique to display or offer to shoot one for a client.
REOURCES:
Red River8.5 x 25 inch Pano Paper
Blog:How To Get Bigger Prints From A Small Printer
Original Publication Date: February 05, 2026
Article Last updated: February 05, 2026
Related Posts and Information
Categories
About Photographers
Announcements
Back to Basics
Books and Videos
Cards and Calendars
Commentary
Contests
Displaying Images
Editing for Print
Events
Favorite Photo Locations
Featured Software
Free Stuff
Handy Hardware
How-To-Do-It
Imaging
Inks and Papers
Marketing Images
Monitors
Odds and Ends
Photo Gear and Services
Photo History
Photography
Printer Reviews
Printing
Printing Project Ideas
Red River Paper
Red River Paper Pro
RRP Products
Scanners and Scanning
Success on Paper
Techniques
Techniques
Tips and Tricks
Webinars
Words from the Web
Workshops and Exhibits
all
Archives
June, 2026
May, 2026
April, 2026
March, 2026
February, 2026
January, 2026
November, 2025
September, 2025
August, 2025
more archive dates
archive article list


Red River Paper Inc. All contents © 1997 - 2026. 8900 Ambassador Row, Dallas Texas, 75247. Prices, specifications, and images are subject to change without notice. Not responsible for typographical or illustrative errors. Website Terms & Conditions | Acceptable Use
Site Development & Maintenance: Phosphor Media, LLC