Free AI App Converts Grainy Photos Into Grain-free Digital Images
Grain, Grain, Go Away! For 100 years photographers have had to live with it if they wanted to use 35mm cameras to capture images with natural light. Now, there's a quick and easy way using the power of AI. Photo by Ilona Panych
By ARTHUR H. BLEICH
Grainy images can result when you enlarge legacy B&W and Color photos that have been scanned. Don't despair. Simple AI software can remove unsightly film grain to give those old photos new life.
Early photographs were usually printed by placing them in contact with the large negatives they originated from; their grain structure remained virtually invisible. But when the first Leica 35mm cameras appeared in 1927, the ground rules changed; their tiny negatives had to be enlarged and the bigger the print, the more visible their sandy-looking texture became. Photographers dubbed it “grain†and the Holy Grail of roll-film manufacturers was to reduce its size.

It was impossible to eliminate grain entirely because without it, the image could not exist. These tiny particles of light-sensitive silver halide crystals were embedded in the film's light sensitive layer. When light struck them, and the film was subsequently processed in chemicals, the crystals transformed into microscopic clumps of metallic silver (or color dyes), creating the visible grain effect and thus, the image.
In the digital world, pixels are somewhat analogous to grain. If you don't have enough of teem to work with, your image will degrade when you try to enlarge it too much. But sophisticated AI software can, with a high degree of accuracy, add more pixels to make up for those that are missing and your printer can then output stunning enlargements.
Putting AI To The Test
As I was writing about a free image upscaler called Upscayl AI a few months ago (see Resources below) it suddenly occurred to me that while you cannot remove photo grain from an original analog photo, scanning it would convert the image and its grain, into pixels. And then, perhaps, the AI upscaling app might be able to use its magic to keep the grain from becoming distracting when the image was enlarged. I decided to give it a try.
For a test image, I chose an aerial photo I'd shot over a half-century ago while on assignment to document Alaska during its six months of winter darkness. I was using an ISO 400 film that would be “pushed†to ISO 1200 in a special developer. However, the process would also make the grain swell to sizes “as big as baseballs†so the saying went.
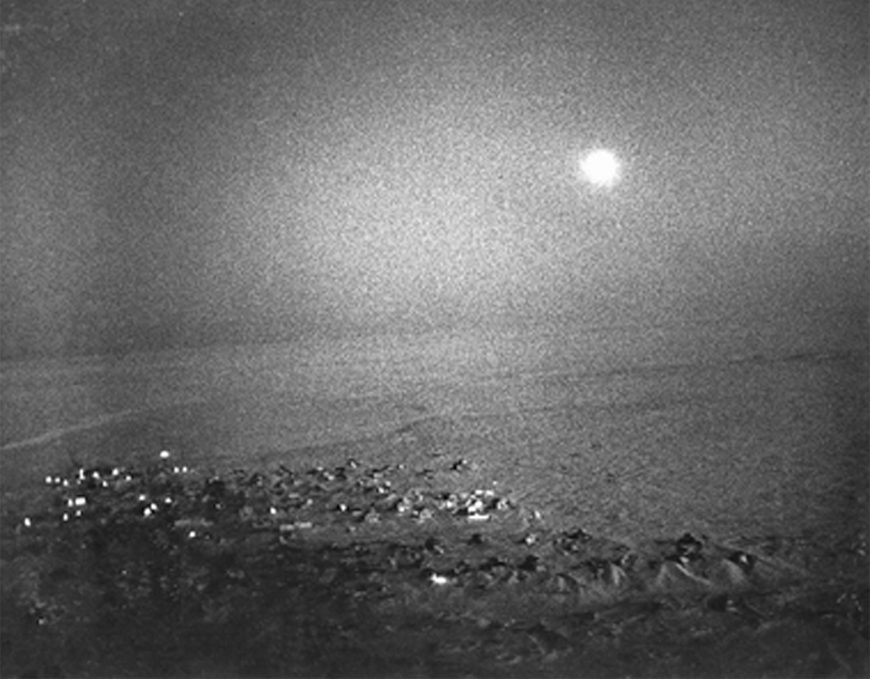
After bringing my test image into Upscayl AI, I set the Image Scale value to “1†because I didn't need to make the image bigger, just remove the grain. In a few minutes the image was processed. Humm… good try, but no cigar; it was still grainy.
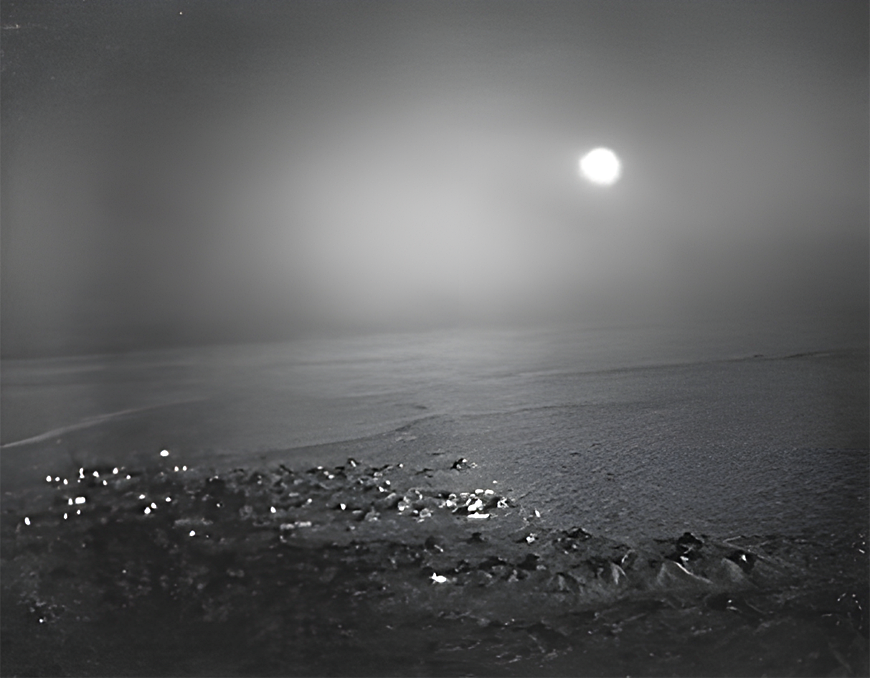
Then I realized I'd been going about this the wrong way. I was not taking advantage of what AI upscaling does best— precisely adding countless pixels to low resolution images so they can be enlarged to bug sizes without losing quality. Setting the Image Scale to “1†was not giving the software a chance to do its thing.
Using Photoshop I reduced the size of my image by 50%, increased the upscale value to “4†and tried again. Bingo! There was still a nagging question, though. If grain makes up the image, how can AI remove the grain without erasing the image? A leading AI developer told me that AI can be taught to digitally reverse the grain effect so that the contents of the original photograph could be preserved. That settled, follow along and I'll take you through the process.
How To Remove Unwanted Film Grain
1. Begin by reading the Upscayl AI blog post (see Resources below) and then download, install, and open the software. It's free.
2. If you have an image with undesired grain that has been scanned, you're ready for the next step. If not, scan one. Or select a grainy image on the web and use a screenshot of it.
NOTE:. Upscayl does not modify your original image; it works with cached copies of it.
3. Open the image in Photoshop (or other) and size it anywhere from 5x7 to 8 x10 inches at 72 ppi. The image dimension and resolution is not critical as you are just going to get the hang of the procedure. Save the image to your desktop, if possible, so it's easy to find.
4. Open Upscayle AI and drag your image from the desktop (or wherever it is) to the uploading pad (or use Select an Image in the menu) and it will appear on screen. (Step 1 on Upscayl).
5. Set the AI Model to Standard. (Step 2 on Upscayl).
6. Set 3x on the Image Scale slider. Make sure Double Upscale is NOT checked. (Step 2 on Upscayl) .
7. Leave Image Path blank. (After your image has been processed, its file will return to wherever it came from.)
8. Press the Upscayl Button. (Step 4 on Upscale).
9. Wait for results and then inspect your image.
10. Your image has been automatically saved to the folder from which it came from or one you've designated.
If you have an image where patches of grain remain, you can run the same image again through the Double Upscayl option. (Step 2 on Upscayl). Or you can run a copy you previously made at a higher Image Scale setting.
FINALLY…
- Do not to use very high resolution images or else your file sizes will balloon along with processing time. Use only as much Image Scaling as you need to eliminate the grain.
- Try different models to see how they handle the same image.
- Upscayl AI appends the amount of image scale and model used to the image file name so you can always tell what settings were used.
After you've achieved the results you want, you can take your image back into you imaging program and manipulate it further as you would any image. You can change the size and/or other attributes of the image prior to printing it.
RESOURCES:
Previous Red River Paper blog post on how to download and use Upscayl
https://www.redrivercatalog.com/blog/upscale-your-images-wit...
Original Publication Date: August 31, 2025
Article Last updated: September 03, 2025
Related Posts and Information
Categories
About Photographers
Announcements
Back to Basics
Books and Videos
Cards and Calendars
Commentary
Contests
Displaying Images
Editing for Print
Events
Favorite Photo Locations
Featured Software
Free Stuff
Handy Hardware
How-To-Do-It
Imaging
Inks and Papers
Marketing Images
Monitors
Odds and Ends
Photo Gear and Services
Photo History
Photography
Printer Reviews
Printing
Printing Project Ideas
Red River Paper
Red River Paper Pro
RRP Products
Scanners and Scanning
Success on Paper
Techniques
Techniques
Tips and Tricks
Webinars
Words from the Web
Workshops and Exhibits
all
Archives
June, 2026
May, 2026
April, 2026
March, 2026
February, 2026
January, 2026
November, 2025
September, 2025
August, 2025
more archive dates
archive article list


Red River Paper Inc. All contents © 1997 - 2026. 8900 Ambassador Row, Dallas Texas, 75247. Prices, specifications, and images are subject to change without notice. Not responsible for typographical or illustrative errors. Website Terms & Conditions | Acceptable Use
Site Development & Maintenance: Phosphor Media, LLC