Borderless Printing: How to Print Full Page Without a White Border
LIVING ON THE EDGE-TO-EDGE
Sometimes, you'll want to print your photographs or other artwork with no borders, just like a photo lab. It's a dynamic look that immerses viewers into your work, optimizing the full paper surface. Although most inkjet printers aren't set by default to accommodate your wishes, you can configure your printer so images appear edge-to-edge on the paper.
But first — pick the right paper. Before we learn how to set up your Epson, Canon, or HP printer for borderless printing, keep in mind that the right paper with the right surface at the right price can be tricky to find. Enter Red River Paper! We have the largest assortment of inkjet photo paper and fine art papers that are popular for borderless printing projects. Here's a list of sizes that are best for printing borderless. Click to shop for that size.
Special tips about borderless printing:
- Make sure your images are the size or slightly smaller than your paper.
- Not all sheet sizes can be printed borderless. Your printer maker sets the options at the factory.
- As a rule, a custom size you define cannot be borderless printed. However, in limited cases on limited Epson models, you can create custom sizes to print borderless. More on this in a bit.
- Check your printer specs before ordering paper in bulk.
PRINTING BORDERLESS WITH WINDOWS
Below are quick instructions.
Canon
- Go to “Printing Preferences.â€
- Now go to “Page Setup.â€
- You should see a section on that page called “Page Layout.†Choose “Borderless†and print.
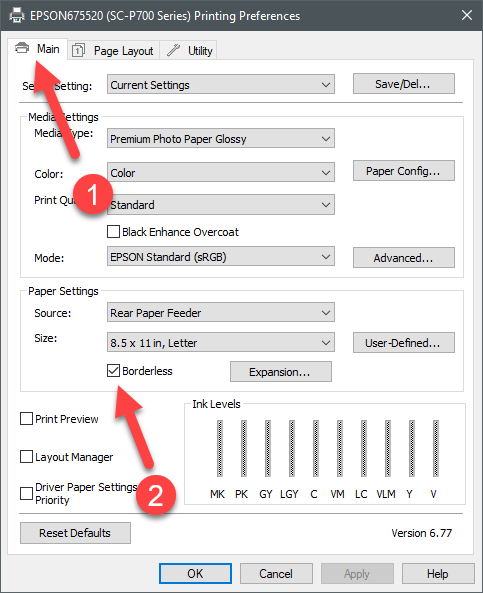
Epson
- Go to “Printing Preferences.â€
- Now go to “Main.â€
- From here, go to the “Page Settings†section.
- See two options, “Source†and “Size.†In “Size,†select “Borderless†and print.
NOTE: Epson has different driver interfaces. Below is one example of what you are likely to see. If you do not see your exact driver type, don't panic! Carefully inspect the Main and Page Layout or More Options tab for the borderless printing check box.
HP
- Go to “Printing Preferences.â€
- Find the “Features†page.
- See a section called “Paper Size Options.†Select “Borderless†and print.
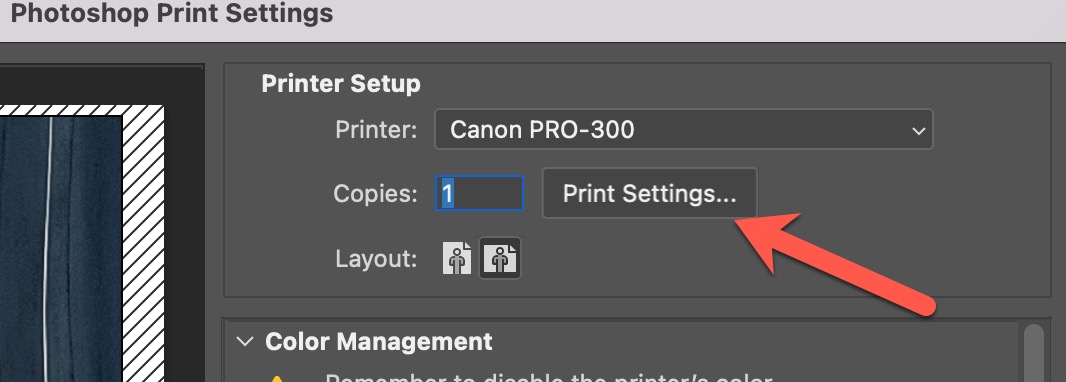
PRINTING BORDERLESS WITH MAC
Mac paper size options are located in the Print dialog. As a rule, you can launch the “Print†dialog by clicking the “Print Settings†button in your editing app. Here's an example:
The “Print†dialog will appear. Locate and click on the “Paper Size†dropdown.
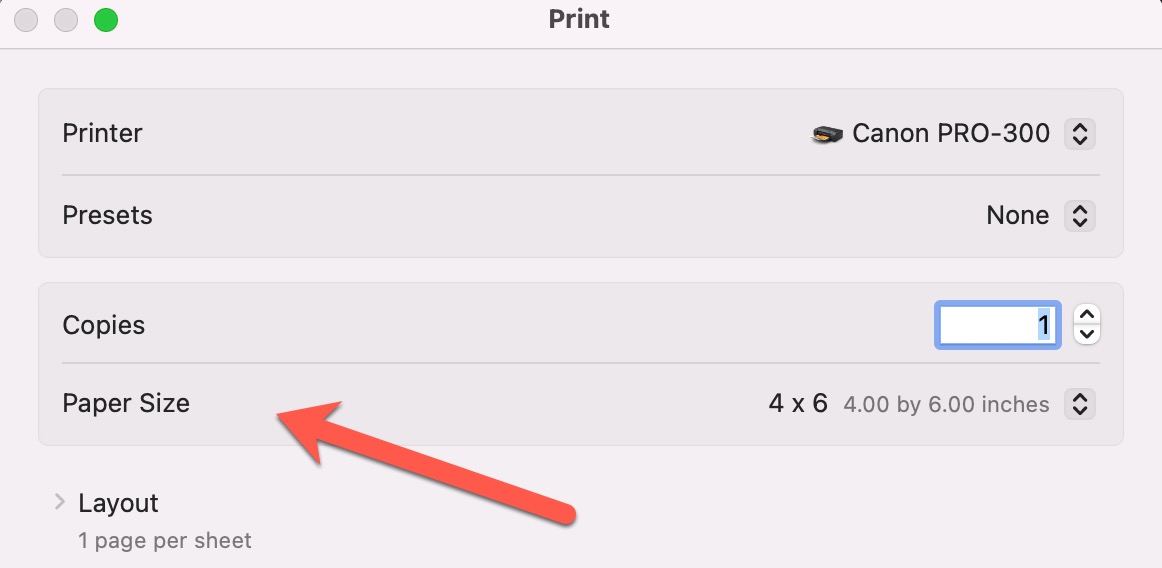
On the "Paper Size" dropdown, you'll see a list of all preset sizes available for your printer. Remember, not every size will be available as a borderless option. The available sizes are set at the factory. See our borderless printing tutorial for more information.
HOW DOES THE “BORDERLESS EXPANSION†FEATURE WORK?
By default, inkjet printers slightly expand your image when printing borderless. This is to make sure that ink extends past the borders. But did you know you can control the expansion amount and, in some cases, turn it off totally? Pull out your printer manual and read up on the feature, or check out our detailed borderless expansion tutorial, which features helpful directions for both Windows and Mac.
IS CUSTOM BORDERLESS PRINTING POSSIBLE? YES — WITH SOME EPSON PRINTERS
Inkjet printers typically do not allow custom sizes to print without borders. But some of the newer Epson inkjet printers can borderless print on some custom sizes. Study your printer driver dialog or review the printer manual for details.
NOTE: Epson gives us a set number of paper widths for borderless printing. The truly custom part of this system is the length of the paper.
Here's a list of Epson printers capable of custom borderless printing (current as of March 2024):
- SureColor P900
- SureColor P700
- P800
- P600
- P400
- XP-15000
- R3000
CUSTOM BORDERLESS WITH WINDOWS
- Open your printer's “Properties Dialog†from your editing software's “Print Dialog†or the “Window Control Panel†> “Device & Printersâ€
- Click the “User Defined†button.
- Check the “Enable Borderless Printing†box.
- Click the “Paper Width†dropdown menu and choose a width.
- Define the custom borderless size.
- Name the size. We recommend including the word “borderless†in the description.
- Set the paper width from the fixed menu.
- Set the height in inches.
- Click “Save.†From now on, the size will be available from the Paper Size dropdown menu.
CUSTOM BORDERLESS WITH MAC
- To define a custom paper size, you need to be in your printer's "Page Setup" or "Print Dialogue."
- Start by clicking the "Paper Size" dropdown menu.
- Locate and click on "Manage Custom Sizes.â€
- Custom borderless sizes are limited by printer design and controlled by the width. The list at right shows your options for borderless width.
- After you create and save the size, it will be available in the "Paper Size" dropdown menu.
For more details and visual guidance via screen grabs, see our Custom Borderless Printing with Epson Printers resource.
SUMMING IT UP
Borderless printing gives your prints a professional look without the distracting white margins. With this article and the tutorials on our site, you are sure to get the borderless results you desire. We can't wait to see what you create!
Original Publication Date: February 20, 2024
Article Last updated: April 03, 2025
Related Posts and Information
Categories
About Photographers
Announcements
Back to Basics
Books and Videos
Cards and Calendars
Commentary
Contests
Displaying Images
Editing for Print
Events
Favorite Photo Locations
Featured Software
Free Stuff
Handy Hardware
How-To-Do-It
Imaging
Inks and Papers
Marketing Images
Monitors
Odds and Ends
Photo Gear and Services
Photo History
Photography
Printer Reviews
Printing
Printing Project Ideas
Red River Paper
Red River Paper Pro
RRP Products
Scanners and Scanning
Success on Paper
Techniques
Techniques
Tips and Tricks
Webinars
Words from the Web
Workshops and Exhibits
all
Archives
June, 2026
May, 2026
April, 2026
March, 2026
February, 2026
January, 2026
November, 2025
September, 2025
August, 2025
more archive dates
archive article list


Red River Paper Inc. All contents © 1997 - 2026. 8900 Ambassador Row, Dallas Texas, 75247. Prices, specifications, and images are subject to change without notice. Not responsible for typographical or illustrative errors. Website Terms & Conditions | Acceptable Use
Site Development & Maintenance: Phosphor Media, LLC