Revealed! The Secret Life of Your Inkjet Printer
By Arthur H. Bleich
An inkjet printer reproduces an image's square pixels by squirting tiny, round drops (also called dots or micro-dots) of ink onto paper from nozzles located in its printhead. The printhead moves over the paper horizontally, laying down multiple rows of dots at the same time. The number of rows is determined by the size of the printhead and varies from printer to printer.
Depending on settings you choose, the printhead will move in one direction only– coming back to its starting point each time– or it can lay down dots in both directions. It can also (as you choose) chug along slowly (for more detail) or speed up to output a print more quickly. And most printers can do any combination of the above at your command.
Printer Resolution Is Measured In Dots-Per-Inch (dpi)
The number of dots laid down at the same time along a horizontal and vertical inch of paper indicates the resolution that you have selected and is measured in dots-per-inch (dpi). The color of each pixel is made by many dots being laid down on top of one another in rapid succession. The printer has to have at least three ink colors (Cyan, Magenta and Yellow) plus Black (abbreviated by the letter K) to create a color image.
NOTE: Do not confuse printer resolution with image resolution which is comprised of square pixels and measured in pixels-per-inch (ppi). Many photographers refer to the number of pixels in an image as dpi which is not correct.
You may wonder how square pixels can be formed by round dots. Try this: take a pencil with a very sharp point and use a series of dots to outline a square. When you look at it from a distance, it looks square because the dots are so tiny that they look like a straight line. Printer dots can also be varied in size; large dots for shadows, smaller ones for highlights– all at the same time as the printhead moves over the paper.
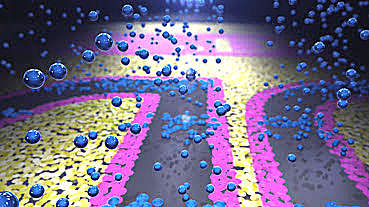
A bug's eye view of printer drops falling onto paper. Photo courtesy of Landa Digital Printing
Photo printers have multiple, user-selectable, dpi resolution settings. Generally speaking, on some Epson printers, settings of 720 x 720 dpi or 1440 x 720 dpi will reproduce each individual pixel sharply and its color accurately. When printer resolution is expressed as two different numbers, for example, 1440 x 720, the larger number is the horizontal number of dots-per-inch laid down and the smaller number indicates the dots-per-inch laid down vertically as the printhead moves across the paper. On a practical level, you need not be concerned about this as you will see next.
Printer Settings For Best Results
Inkjet printer manufacturers always tout their highest printer resolution as if it were some kind of Holy Grail. At this point you might be thinking: “I can't find any numbered resolution settings on my printer†and you'd be right, because, depending on the paper type you select, the dpi values correspond to print menu settings that have names such as Draft, Standard, Normal, Photo, Best Photo, Fast Photo, Fine Photo or some other name. And they are usually listed in the menu beginning with the lowest resolution. Some are not available with all paper types. The menu choices displayed are usually limited to higher-resolution settings when you use high-end papers. Don't get glassy-eyed at this point; just follow along.
Each of these settings determines how many ink dots-per-inch are laid down that ultimately define the quality of each pixel– from a very low 320 to a supposedly-enhanced 5760 dpi or higher. The general rule is that the higher the dpi the better the tonal nuances of the image, its color quality and color blending. The lower the dpi, the more “grainy†the image is apt to look. But the following example may give you something to think about.
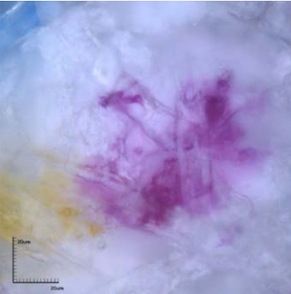
Papers can have a huge impact on image quality. Here's a single dot of ink on plain paper. Photo Courtesy of Landa Digital Printing.
Recently, one of my neighbors wanted to re-paint his gray barn a traditional red. He put the first coat on but some gray still very faintly showed through in a few spots. So he gave it a second coat and it looked perfect to me. But then he decided to give it an a third coat– “Just to make sure.†Trust me, it didn't look any better.
You only need enough printer resolution to get an image that looks good to you. And that means you should run a one-time test, using your favorite Red River papers, to print the same image at, say, around 8 x 10-inches using different settings and then comparing them. You'll then know what works and what doesn't. And once you do, it'll save you a lot of time and a bundle of money on ink.
Printing at a dpi setting that's too low will give you a lousy image. But printing at one too high will slow down the printing as more dots are needed to be laid down for each pixel and in some cases may even make your photo look somewhat blurry. And it will definitely use more ink, sometimes twice as much. So let your eyes be your guide and view the results at a normal viewing distance– not under a magnifying glass or, as some nit-pickers do, under a microscope.
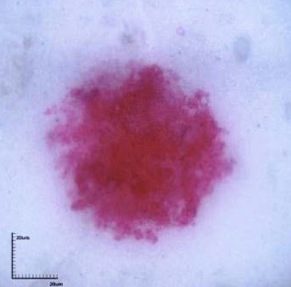
The same color dot as on the previous image but on a coated paper such as Red River photo paper. Photo Courtesy of Landa Digital Printing.
For most images, 720 dpi of printer resolution (usually the Photo setting) will be enough when printing a photo at an image resolution of 200-300 pixels-per-inch (ppi). On some images that contain subtle tonalities, 1440 might show those differences better but not always. In any case, my experience has been to steer clear of or super-high settings. Don't be reluctant to try the “Hi Speed†option (named different things on different printers) which tells the printhead to lay down dots in each direction of its travel. Bi-directional printing can speed up printing and still produce acceptable results. You be the judge.
Now here's another point: If you make big prints, say 11×14 and larger, you will normally view them from further away. Therefore, your eyes cannot resolve as much fine detail as if they were viewed close up. Which means, you can sometimes “get away†with using lower resolutions in both ppi and dpi. It might surprise you to learn that billboard photo art is usually printed at very low resolutions because that's all that's needed for the human eye to blend them into a perfect image at the longer distance from which they're viewed.
Finally, outputting a quality print at any printer resolution setting depends on your printer firing those micro-dots of ink through each and every nozzle. So regularly run a nozzle check and do a cleaning cycle if some are clogged. In fact, if you do have a partial nozzle clog that you don't have adequate time to clear, going to a higher dpi setting on your printer can sometimes temporarily solve the problem.
To sum it up
Using a high dpi setting on your inkjet printer (such as Fine or Superfine or whatever)cannot improve the basic quality of your image; only more pixels in the image can do that. If you try to enlarge your picture too much, pixels get bigger and bigger and begin to be noticed; a high dpi setting on your printer may just make them look better defined so you can see them at their worst. You must have enough pixels in your image to begin with and they must be close enough together so as not to degrade your resulting image.
But that's a whole topic of its own called called “image resolution†which we'll explore at another time.
Original Publication Date: July 02, 2023
Article Last updated: May 17, 2024
Related Posts and Information
Categories
About Photographers
Announcements
Back to Basics
Books and Videos
Cards and Calendars
Commentary
Contests
Displaying Images
Editing for Print
Events
Favorite Photo Locations
Featured Software
Free Stuff
Handy Hardware
How-To-Do-It
Imaging
Inks and Papers
Marketing Images
Monitors
Odds and Ends
Photo Gear and Services
Photo History
Photography
Printer Reviews
Printing
Printing Project Ideas
Red River Paper
Red River Paper Pro
RRP Products
Scanners and Scanning
Success on Paper
Techniques
Techniques
Tips and Tricks
Webinars
Words from the Web
Workshops and Exhibits
all
Archives
June, 2026
May, 2026
April, 2026
March, 2026
February, 2026
January, 2026
November, 2025
September, 2025
August, 2025
more archive dates
archive article list


Red River Paper Inc. All contents © 1997 - 2026. 8900 Ambassador Row, Dallas Texas, 75247. Prices, specifications, and images are subject to change without notice. Not responsible for typographical or illustrative errors. Website Terms & Conditions | Acceptable Use
Site Development & Maintenance: Phosphor Media, LLC